Showing posts with label Christmas. Show all posts

Wednesday, September 18, 2024

Nativity Scene Tag with Buttons Galore & More~

Hi there!!!
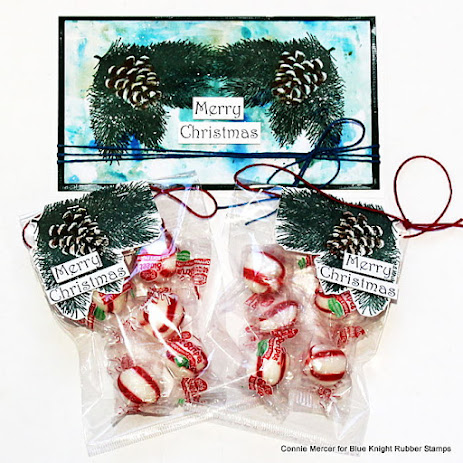
Today I'm sharing a mixed media tag using the 
super cute Nativity Scene Novelty buttons by
Buttons Galore & More (affiliate link) along with stamps.


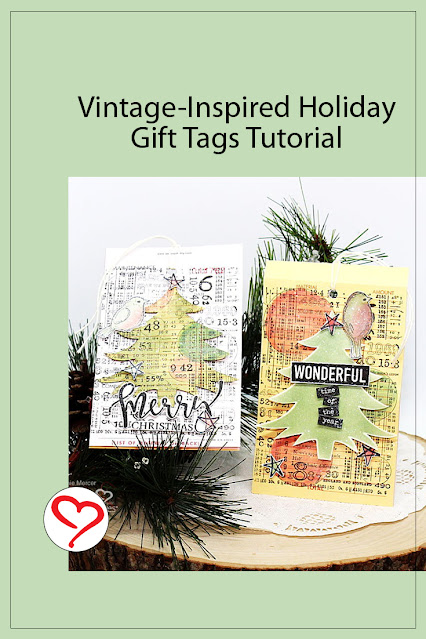
I started with a blank tag and added Distressed Oxide inks (watered down) to
create a background for the stamps.  I used background stamps and a
focal stamp that helps tell the story of the Nativity Scene buttons used on 
the tag.


Added to the bottom corner, a piece of homespun fabric and some black
stitch work.  The Nativity Scene buttons are stitched to the tag.
The words are added and a tag tie, for the top of the tag, along with
buttons dangling (large blue button from Low Tide Set). 


Remember to get 10% off your button order by 
using CONNIE10 when you check out!! 
 

Thanks for stopping by!!!!
Connie
crafty_mercer
Facebook page: Crafty Goodies

Tuesday, July 16, 2024

Sleigh Memory - Dex by Clear Scraps~

H there!
 I'm so excited to share the NEW Sleigh Memory-Dex
 by Clear Scraps. They carry a selection of  Memory-Dex boxes
 along with the dividers, that go in the boxes.  You can
 design your own Memory-Dex with all the
fun Clear Scraps products. 


I have listed the supplies you will need to create the Sleigh
 Memory-Dex.
Supply List
Clear Scraps: Memory-Dex/Sleigh
Index cards: Vintage Chip 2
Vintage Acrylic 2
Scallop Chip 2
Scallop Acrylic 2
Chipboard Words: MERRY and CHRISTMAS
Border Stencil: Checker Board
other: pattern paper, adhesive (wet) and dry, scenery
stamps, greeting stamps, acrylic paint, Tim Holts
Paper Dolls, shape dies, color mediums (markers,
Pan pastels and colored pencils).


Instructions:
1. Trace the shape of the sleigh on pattern paper and cut out.
Do both sides of the sleigh plus the front and back rectangles between the sides.
2. Stamp the scene on both sides using Archival ink/ Jet Black. 
Using a stamping platform is helpful.
3. Adhere the sleigh cut out to the birch wood cut out. Do both sides.
Beacon Acid Free works great for this. Sand all edges with a sanding block.
4. Stencil the backside of both sleigh pieces using the Checker Board
stencil by Clear Scraps, using dark green acrylic paint.  Also paint
the end pieces with beige acrylic paint.
5. Add Beacon 521 to the edges of the sleigh and line up with
the notches to assemble the sleigh. If the sides are lined up with the
pre-cut notches it slips right in.  
6. Add color to the stamped scene on both sides using Pan Pastels, colored pencils
or markers.  Then shade the edges with Brown ink/Pan Pastel.
7. Paint the chipboard words (MERRY & CHRISTMAS) with dark green acrylic
paint and let dry.  Adhere in place.
8. Finish stamping extras for the scenes and then speckle with white
and black acrylic paint. Place the wood pegs inside and secure the ends with glue.


Index cards:
1. Cover the chipboard index cards with pattern paper and send edges.
2. Die cut Scallop or postage stamp shape for the acrylic index cards.  You
will need two for each acrylic index card. One for each side and secure.
3.  Attach the Paper Dolls to the chipboard index cards giving the appearance
they are on a sleigh ride.
4. The acrylic index cards have dimensional adhesive used to secure the shape.
This also gives a buffer between each index card.
5. Add the Christmas sentiment to the front of the index card cluster
and add twine for color.


Other products used: 
Stamps: Blue Knight Stamps: Chickadee in the woods, Buck, Doe & Fawn,
Horse and Sleigh and Pine and Distant Mountains. KazelKraft: Christmas
Sayings. Darkroom Door: Number Medley, Merry Mail and
Handwritten Ledger.  Adhesive: Beacon: Beacon Acid Free and Beacon 521.
Scrapbook Adhesives by 3L: EZ Runner Grand, 3D Foam Circles and 3D
Foam Strips. Medium: acrylic paint, Pan Pastels and Archival ink.
Tim Holts: Paper Dolls. Dies: Spellbinder: Scalloped Oval.  Kat
Scrappiness: Postage Stamp. Twine. Pattern paper: Echo Park:
My Favorite Christmas.

Thanks for stopping by!
Connie
crafty_mercer
Crafty Goodies Facebook Page

Monday, December 25, 2023

Merry Christmas and Happy Holidays from the past~

 Wishing you all a very Merry Christmas and
Happy Holidays.  I'm sharing some of my
favorite Christmas and Holiday projects.
You might even see one you remember!


Favorite of mine ~ using Katzelkraft, Darkroom Door stamps and 
adhesives by Scrapbook Adhesives by 3L. 


This one is using stamps by IndigoBlu and Scrapbook Adhesives by 3L.
I kinda have a thing for the deer :):)


Using Darkroom Door stamps. Love the green tones!


Gift tags using Darkroom Door stamps and Scrapbook Adhesives
by 3L.  


These are a great collection of Winter themed cards.  Stamps by
Blue Knight Rubber stamps.


Love this Ski Lodge stamp by Blue Knight Rubber stamps.
It is a great winter themed stamp.
  
Thanks for stopping by and would love a follow over
on Instagram.
Connie

Friday, December 23, 2022

Merry Chistmas and Happy Holidays!!!

Hi guys!!
Just wanted to pop on and say
Merry Christmas and Happy  Holidays
to all.  Thank you for the blog support
this year and I appreciate all the love!


{these are little mini trees that I have made in past years.  i wanted 
to create a new one every year, but that hasn't happened.}
so I hope you enjoy these!
See ya soon with the 
Best of 2022 blog post
coming December 31, 2022
Connie

Thursday, August 18, 2022

Silhouette Pines by Blue Knight Rubber Stamps

Hi guys!
More from the  NEW RELEASE by Blue Knight
 Rubber Stamps.  

I'm creating with Silhouette Pines.  Beautifully designed
red rubber stamp.


The top card is colored with panpastels and stamped
with Versaclair/nocturne ink. I use a stamping 
platform when working with silhouette stamps to
re-stamp if needed.  The bottom is torn for a distressed look.
Other stamps used are blessings./One Line Sentiments and
Birds ll.
The second card is stamped with Archival/Grey and the small deer
is from the Buck, Doe and Fawn set. The sentiment is from
sincere condolences./One Line Sentiments. The edges are 
smeared with acrylic paint for a distressed look. Easy and
good looking cards!
All adhesive is by Scrapbook Adhesives by 3L.


Thanks for stopping by.
Connie/DT Member

Thursday, February 17, 2022

Pine Cone Swag by Blue Knight Rubber Stamps~

 Hi guys!
Today I'm sharing a card and a DIY project using
the newly released Pine Cone Swag stamp by 
Blue Knight Rubber Stamps.


The top card is stamped over a mix of Alcohol inks using an
Evergreen colored ink. The pine cones are highlighted with 
white acrylic paint.  The swag is speckled with white acrylic paint.
The sentiment is from the Christmas Koala set.  The card is
matted using dimensional adhesive.
The treat bags are fun and easy!!!
Stamp the Pine Cone Swag on a large sheet of white
cardstock leaving enough room to fold the cardstock over. Score 
the card above the Pine Cone Swag and fold over.  Cut in
half and fussy cut (leaving the fold intact).  This will make two
treat bag toppers and you only stamped one image.
They are colored with Evergreen ink and panpastels.
Adhesive used is by Scrapbook Adhesives by 3L.

Friday, December 3, 2021

Vintage Merchant Gift Tags with Scrapbook Adhesives by 3L~

Hi guys!
Today I'm sharing a fun project repurposing Merchant/Repair Tags
over on the Scrapbook Adhesives by 3L Blog.  I'm showcasing
their 3D Foam Adhesives. Perfect for this project!


The tags are 3 ply so you could use the inside, of the tags, for a
hand written note or stamp a sentiment.  The paper is thin so having
3 ply works great.  They make really fun Christmas Gift Tags.


These are the tags I created with. I used the front  and the back
of the tags to decorate. 


I have all the details on the Scrapbook Adhesives by 3L Blog.  I 
hope you will check it out.  Keep in mind any type of
ephemera that could be made into a tag would work and look
great!!!


Thanks for stopping by and I hope you enjoy this project using vintage ephemera. 
Connie/DT

Creative Time: 40 Minutes
Skill Level: Beginner

Materials Needed
Scrapbook Adhesives by 3L®
3D Foam Squares White Regular
3D Foam Squares White Small
3D Foam Squares Micro White
3D Foam Strips

Other: vintage ephemera, Ink: Distress Oxide and Archival, Stamps: Darkroom Door and Crafty Individuals, Stencils: Darkroom Door, twine.

 PIN IT!!!

Friday, November 12, 2021

Coffee Lovers Fall/Winter 2021 Blog Hop~

Hi guys!!
Super excited to share the new Coffee Stamp Set 
by Blue Knight Rubber Stamps for the 
Coffee Lovers Fall/Winter 2021 Blog Hop.


I counted up and this is about my 14th Coffee Lovers Blog Hop to 
participate in and what that means is to make a new coffee card and link 
it on the Coffee Loving Cardmakers blogIt is always fun to see the 
creative coffee/tea cards!  
I'll be using products from


And guys I have crafty goodies too!!!! So be sure to scroll
to the end of the post ~


The background to the distressed looking card is created using Distress
Oxide inks and then a stencil (for the rays of goodness that is
coming from the coffee).  The travel mug is stamped over the created
background. I used dimensional adhesive by Scrapbook Adhesives by 3L to
add the dimension to the mug and words. 


I used the following products to create this card.


I used four sets by Blue Knight Rubber Stamps to create this card.
The Coffee Makes Me and the NEW Coffee set along with Let's Ride 
(the words) and Horse and Sleigh (on coffee sleeve).


The adhesive is from Scrapbook Adhesives by 3L.  I used the Dual Tip Glue Pen,
3D Foam Strips, 3D Foam Squares and the E-Z Runner Grand
Refillable Dispenser. 

*****************************************************
Now for the goodies:
Blue Knight Rubber Stamps is offering a coupon
code just for the Coffee Lovers Blog Hop.
*********
code ~ CL20
Good for 20% off all stamps. expires 11/19/2021
*********
Scrapbook Adhesives by 3L is offering a
$25 prize package (will be picked using
randon.org ) so leave a comment and cross your fingers!!!!
This will be shipped by Scrapbook Adhesives by 3L.
***And if you feel like giving us a follow over on
instagram (@crafty_mercer) tell me in the a separate comment and
 you will get another entry for the adhesive $25 prize package.***
A follow for Blue Knight Rubber Stamps (@blueknightstamps) and
Scrapbook Adhesives by 3L (@scrapbookadhesivesby3l).

Thanks for hopping with us~
Connie 

***********************************
WINNER
#10

Love how you added a handle to the travel cup! Quite a bit of work in this card, nicely done!

***************************************************
Thanks to all that stopped by and left a comment.
cm

Wednesday, November 3, 2021

Gift Tree Tags with Scrapbook Adhesives by 3L~

Hi guys!
Today is my turn on the Scrapbook Adhesives  by 3L Blog.  I created a
couple Tree Tags that will double for a gift card but these can be hung on
a Christmas Tree.  It is also a cool idea for tree decorating!!


I used the Keepsake Envelopes and the Adhesive Sheets to keep
it simple and cute.  I have all the details on the Scrapbook Adhesive
by 3L.
  I hope you will take a look.   I created these using the vintage 
library card envelopes but you can make a pocket and that
will work too.  I tell you how on the Scrapbook Adhesives by 3L Blog.


Thanks for stopping by,
Connie

Creative Time: 45 Minutes
Skill Level: Beginner

Materials Needed
Scrapbook Adhesives by 3L®

Keepsake Envelopes
Adhesive Sheets 4″x6″
E-Z Runner Grand Refillable Dispenser
E-Z Runner Grand Repositionable Dots Refillable Dispenser
3D Foam Squares White Regular
3D Foam Strips

Other:
Pattern Papers, Die Cut Shapes and Stickers: Doodlebug Design (Christmas Magic Collection); Vintage Library Card Envelopes; Twine; Glitter Pen

Pin It!!


Tuesday, October 19, 2021

Christmas Gnome card with Scrapbook Adhesives by 3L~

 Hi guys!
I'm Creating with a really cute set called Slim Winter Gnomes
 by Stampendous! along with my 3D Foam Adhesive (that I 
really love)
by Scrapbook Adhesives by 3L


This is an easy card to create, it just takes time to paint each of the 
Gnomes.  I used Distress Oxide inks and picked Christmas
colors to paint with. 


I have all the details on the Scrapbook Adhesives by 3L Blog.
 Hoping you will check it out :):)

Thanks for stopping by~
Connie


Creative Time: 45 Minutes
Skill Level: Beginner

Materials Needed:
Scrapbook Adhesives by 3L®

E-Z Runner Grand Refillable Dispenser
E-Z Runner Grand Permanent Strip Refill
3D Foam Strips
Crafty Foam Tape 108 ft.

other: Stampendous! Stamps: Slim Winter Gnomes and Times Together, Distress Oxide ink (used Christmas colors), glitter pen, grey cardstock, and white cardstock

Pin It!!


Thursday, August 26, 2021

Christmas Koala by Blue Knight Rubber Stamps~

Hi guys!
Today I'm sharing cards created with the newly
released Christmas Koala by Blue Knight Rubber Stamps.


Both of the cards are created in the same way using the
same supplies, except for the paper.


This is watercolor paper/cold press card. The ink used is Distress
Oxide inks for added color.  The sentiment is stamped
with Archival/Jet black ink. Both cards are sized to a 
4" X 4" size.


The paper on this card is matt coated cardstock.  It has a slick
feel to it.  It makes the same inks look softer. I really love
the look.  The adhesive is by Scrapbook Adhesives by 3L.


  Would love to see you join us over on the
Thanks for stopping by~
Connie/ DT Member

Tuesday, July 13, 2021

Christmas in July with Topflight Stamps~

Hi  guys!
How about Christmas in July with Topflight Stamps.


Today I'm creating with Darkroom Door and the super cool
Christmas stamps that were released at the end of 2020. 


 I used two Christmas sets and the newly released Handwoven
background stamp.  I thought it was so perfect for this card.
All you need is two colors of ink to create the background.
The stamp images were cut out and layer using
dimensional adhesive to get this mixed media look. 
Check out all the details on the Topflight Blog here