Monday, May 30, 2016

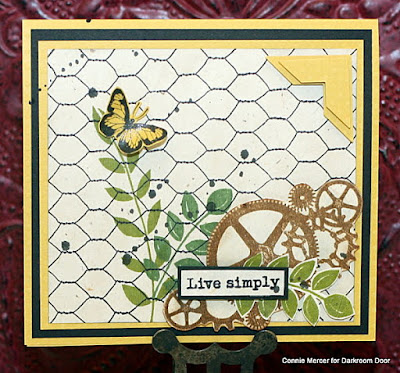
Cog Collection by Darkroom Door~

Hi guys!
I have a card to share with you using one of the releases from 
Darkroom Door called Cog Collection  I did scratch my head on this one, but came up with this.


My take on this ~ live simply even though sometime things are complicated.


Instructions:
Stamp Carved Leaves Vol.1 on beige cardstock. Stamp two leaves on the front of the card, using two different shades of green ink. Stamp a third leaf and cut it out.  Using the Chicken Wire background stamp, stamp over the leaves on the card front. Giving the effect the leaves are behind the Chicken Wire. This card is 5" X 5".  Stamp the Cog in brown ink, using the same beige cardstock and cut it out.  Shade the cutout Cog with brown ink. Stamp the words "Live Simply" on the beige cardstock and trim out. Mat the words on black cardstock. Adhere the Cog next to the leaves on the card front. Adhere the third leaf on top of Cog and then the words. Mat card front on yellow cardstock and then black. Then adhere card front to yellow cardstock. Stamp small butterfly on the same yellow cardstock and cut it out. Adhere to front of card. Speckle with black ink or similar product. Apply Wink of Stella to leaves.  Add corners.

Darkroom Door products:
Wings
Enjoy the Ride
Carved Leaves Vol.1
Chicken Wire/Background
other:
S.e.i. / Tumble Dye ( for speckling)
Ranger ink
Quick Quotes PowderPuff Chalk ink
Wink of Stella
cardstock

For more inspirational ideas using the Cog Collection stamp go HERE~
Thanks  for stopping by~

Friday, May 27, 2016

A Journal notebook with S.e.i.~

Hi guys!! I'm here with a journal notebook using the Florets Collection by S.e.i.  In the collection it has a sheet of cork paper.  It's not paper, it is cork but the size of paper.  I really wanted to create something with this, very cool, sheet of cork.   I decided to cover a composition notebook with it ~


I started out like this~

I used double sided tape to hold the cork paper in place. Place the double sided tape as close to the edge of the composition notebook as you can.  The cork will chip off, if it is not right on the edge.  Cut some one inch strips of paper to cover up the seem.  Take a pillow box and cut it half and use the bottom to hold the flowers.


The Florets die cut flowers can be arranged like a bouquet.  The centers are in the Florets sundries pack.  I also added Bright paper doilies under the pillow box for color.  Speckled with black Tumble Dye to finish it off. Looking forward to using this journal notebook.  

Thanks for stopping by~
Connie

Thursday, May 26, 2016

May tag with Clear Scraps!

Hi~ the May tag is ready. Hope you like it. I was thinking about the Beach when I created this!!

May3

Products used:
Clear Scraps Stencils: Hope is~ Border, 6” Spiral and 6” Chevron.  Chipboard Embellishments: Kites. Tag: Acrylic.
Other:  Acrylic paint, chalk inks, rubber stamps, steel dies, trim and Beacon 3-IN-1 adhesive.
Instructions:
Remove plastic film from acrylic tag.
Trace the shape of the tag on the pattern paper and cut around.
Shade the paper tag. Stencil images on the paper tag.

May1

Stencil the Anchor image and Boat Steering Wheel  image on coordinating paper and cut them out.
Use ink or acrylic paint to stencil.  Paint chipboard kite and  speckle with yellow paint. Stamp the Sea Shell on coordinating paper with ink or paint and cut it out.

May2

Cluster images on the Acrylic tag and adhere to the front of the tag.
Adhere paper tag to acrylic tag and add yellow trim.
Adhere chipboard kite and speckle the tag with black paint or ink.


Thanks for stopping by~
Connie Mercer/DT Member

Tuesday, May 24, 2016

Try It Tuesday~painting hangers!

Hi guys!
Thanks for stopping by for Try It Tuesday.  
I painted on these hangers for a sweet girl getting married.  These were for
 her bridal party.  Thought I would share them~


I sanded the area, that I was going to paint on, to take the varnish off.  I practiced my
 design and then went for it.  I did each section at a time.  

I put the black stem line on first,  center flower and then the leaves.  Added the 
white dots (use the end of the paint brush to make these) and the vine. 
Seal with varnish after the paint is dry.  
Add trim.
This is assembly line crafting at its finest :) 
~
See ya soon!

Monday, May 23, 2016

Friends scrapbook page with Quick Quotes!

Hi, Connie here with a scrapbook page using the Chiffon Collection by Quick Quotes.  The papers are lovely together, so I wanted to use as many as I could.


Instructions:
1. Gather the papers you would like to use for the center cluster.
2. Cut them in different sizes and distress the edges.
3. Ink with Quick Quotes PowderPuff Chalk Inks/Light Moss and Warm Sand.
4. Cluster them in the center of the page with all the papers peeking out.  That is the photo mat that will hold your photo.


5. Using a steel die, stickers or a stamp add leaves to the center cluster with the photo.
6. Add a Quick Quote sentiment from the Chiffon Collection.


7. Title the page.
8. Journal the event.
9. Speckle with mist if desired.

Quick Quotes products used:
Chiffon: 100, 103, 104, 105 and 500.
Quick quote PowderPuff Chalk Inks: Midnight Confession, Light Moss and Warm Sand.

other:
Darkroom Door stamp
Steel dies
stickers
S.e.i./Tumble Dye (for speckling project)

Thanks for stopping by~
Connie Mercer/DT Member


Friday, May 20, 2016

Junkin' and shoe forms~

Hi guys!
 I have a fun junkin' post for you.  I found some old music holders, 
for band instruments, at a resale shop yesterday. 
$5 each~

and this ~ $5 

 And do you remember the boot form from Mexico?
********************************
I came up with this using these junkin' finds~

I stenciled a 6 on the boot form and hubby drilled  it out so the 
Music holder could be inserted.
The door knob has a wooden shim in the center and then drilled out to insert 
the Music holder.

The door knob is rounded so it rocked,  hubby put it on the sander and leveled it out.
  Took off the high point of the door knob.

I love the way look together~clustered in a group.  I want to get cute face pictures
 of the grands to showcase! 
I'm working on several more junkin' posts, I'll get them up soon~stay with me :)
Thanks for stopping by ~
Have a great weekend.
***********
Linked at My Salvaged Treasures~

Wednesday, May 18, 2016

Brothers ~

Hi guys!
I have a scrapbook page, nothing fancy, but I love the story and the people
 in the pictures. 
 They are brothers (hubby and his brother) and very rarely are photographed together.
I used some Bo Bunny to help me scrap my page:)


I even made the German Sweet Chocolate Cake for his birthday.
Thanks for stopping by~
  

Monday, May 16, 2016

Mixed Media Pillow with Clear Scraps!

Hi, Connie here with a Mixed Media project using the unique and very cool stencils by Clear Scraps.  I used a total of nine stencils on this project.  All the way from 12" to 6" stencils. I started with a texture paste and my favorite stencil by Clear Scraps.   Layer the stencils on the canvas pillow, overlapping the stencils is a good thing.

Clear Scraps stencils pillow Connie Mercer

Use acrylic paint, spray mists, Distress stains are all good to apply color the project.  When my project is complete I spray it with an acrylic sealer.  Sets the colors so no bleeding will occur if the project gets wet or damp.  I line up my colors of paint, along with the stencils I want to use.  Once I have used the stencils  I drop them-into the kitchen sink, full of warm soapy water,  for quick cleaning.  Then I lay them on a towel and let them dry.  Pretty "no fuss".

Pillowmm2

Example of permanent marker for outlining images.

Pillowmm3

Added some white highlights of color, to the letters, by using a small paint brush.

Pillowmm4

Clear Scraps products used:
12" Stencils: Fruit of the Spirit and Geo Pattern
6" stencils: Lamps, Doily, Quaterfoil, Quilt, Chevron, Heart Arrow and Spiral Dots.
Other:
DecoArts acrylic paints, Distress Stains, Faber-Castell Whipped Spackle, permanent markers.

Thanks for stopping by~
Connie Mercer/DT Member

Friday, May 13, 2016

The new Eclectic Stamp ~ Treble Clef by Darkroom Door!

Hi guys!
I have a card to share with you using one of the new releases by Darkroom Door.
This one is the Eclectic /Treble Clef.  I used it like a background stamp and loved the results:)


Instructions:
Using the Treble Clef eclectic stamp like a background stamp, stamp it several times on a sheet of script pattern paper.  Use the ink color that will coordinate with the pattern paper.  Cut to size 5"X 5". Mat on black cardstock and then on the pattern paper that will be the card.  Using green ink, stamp out two leaves and cut them out. Adhere them to the corner of the card (building a cluster). Stamp out a bird using brown ink and cut it out . Add the small bird to the cluster. Stamp out the sentiment saying and poem on white cardstock. Trim out. Mat poem on black cardstock and adhere to center of the card. Sentiment goes in the lower left corner. Add punched corners and speckle with black ink or similar product.
 
Darkroom Door products used:
Simple Sayings
Carved Leaves Vol.1
Love Birds
Treble Clef/Eclectic
 
other:
Graphic45 pattern paper
Ranger ink
Quick Quotes PowderPuff Chalk Ink
S.e.i./Tumble Dye/Black (for speckling)

For more inspiration using this stamp go HERE~
Thanks for stopping by~


Thursday, May 12, 2016

May Club Q by Quick Quotes!

Hi, Connie here to share with you what I created using the May Club Q  kit by Quick Quotes.  This is a fun one!  If you love hexagons, the color orange, flowers, strips ~ it is all in this kit.  I was able to create two scrapbook pages and one card.  The first page~

   I started laying out the hexagons to see what kind of pattern or design I could create.

The kit comes with chipboard shapes also.  I colored those with Quick Quotes PowderPuff Chalk inks along with shading the edges of the shapes with different colors of Quick Quotes PowderPuff Chalk inks.

Flowers and ribbon together make a cute garden for a page. I added cardstock, to the pages, that is not in the May Club Q kit.
The second page~
Still just creating with the hexagons and Quick Quotes PowderPuff Chalk inks.  The bright buttons are also in the  May Club Q kit~


I was able to create one card from the May Club Q kit scraps~


Quick Quotes Products:
Quick Quotes PowderPuff Chalk inks: Midnight Confession, Navy, Sunset, Peach Tree and Orange Slice.

Thanks for stopping by~
Connie Mercer/DT Member

Tuesday, May 10, 2016

The Floret Collection with S.e.i.

Hi, Connie here with a scrapbook page using the Floret Collection by S.e.i.  This is a gorgeous collection of Spring papers and it is always fun to add a little Tumble Dye to create a background for cardstock.  What I love about using the Tumble Dye for paint splats is, it is quick to dry.  So important for damage control. 
The greens and gold colors in the Floret Collection were so perfect for these photos.  The cobalt blue is a great addition to the colors used in this collection. Spring is in the air!
The selection of stickers are great to cluster on areas of the scrapbook page.  Adding dimension, to the stickers, gives for a great look.

Back to the Tumble Dye / Brown, this is a fabulous product to use for paint splats on paper.  It is quick to dry and doesn't bleed through the cardstock.  My new "go to" for paint splats or paint dots.  Try it, you will want every color of Tumble Dye to create with.
Thanks for stopping by~

Monday, May 9, 2016

A scrapbook page~ using some old and fabulous Bella Blvd.

Hi guys!
I have a scrapbook page share that is super cute:).  I mixed some old Bella Blvd. 
collections that I just had pieces of.  I loved how the colors, in the papers,
 matched with the different collections. 

Starting them out young and training them to respect firearms.
Did this one for a really good friend~

Have a great weekend and I'll see ya soon~

Friday, May 6, 2016

A stencil and paint ~ Clear Scraps!

Hi, Connie here with a fun mixed media project using a bunch of stencils by Clear Scraps! To be exact I used eight different, totally unique stencils. The more the better.  You will need some acrylic paint,  texture paste and a canvas.  I used a 12" x 12" piece of canvas material for this project.

Clear Scraps stencils Connie Mercer

I started with adding texture paste and then paint with the stencils.  layering the stencils give such a great look.  Outlining the images, with a permanent marker pen,  is also fun.   Line up your favorite colors and start adding them to your canvas.   After all the paint was added and the canvas was completely dry,  use an acrylic spray sealer over the canvas.  Makes everything look bright and colorful.

Clear Scraps products used:
6" stencils: Polka Dots, Stars, Spiral, Heart Arrow, Spiral Dots, Diamonds and Chevron.
Border stencil: Hope is
Other :
acrylic paint, distress stains, Faber Castell/Whipped Spackle, vintage trim, Darkroom Door and Beacon Adhesive 

Thanks for stopping by~
Connie Mercer/DT Member

Thursday, May 5, 2016

Eat More Cake with Darkroom Door!

HI guys!
I have a card to share using the new Quote stamp, Eat More Cake by Darkroom Door.  Love the name :)


Stamp on white cardstock, using the Polka Dots Background stamp. Trim and shade with brown ink. Mount on cardstock.  Mat Photo Chips/ Sweet Treats with cardstock an add small Montage/ Sweet Treats to the center of the Photo Chips. Stamp Quote on white cardstock. Trim out into word strips and shade with ink.  Add to card front.  Add trim.
For more inspiration using this stamp go HERE.

 
Darkroom Door Products:
Photo Chips/Sweet Treats
Montage/Sweet Treats
Background stamp/Polka Dots
Quote Stamp/Eat More Cake
 
Other:
Cardstock
Ink: Ranger and Quick Quotes PowderPuff Chalk Ink
Wink of Stella
twine
Thanks for stopping by~