Showing posts with label Alcohol ink. Show all posts

Thursday, February 24, 2022

Coastal Pines by Blue Knight Rubber Stamps~

Hi guys!
Today I'm sharing cards made using the Coastal Pines stamp
by Blue Knight Rubber Stamps.  It is an easy stamp set to work with 
and is universal for any occasion. 
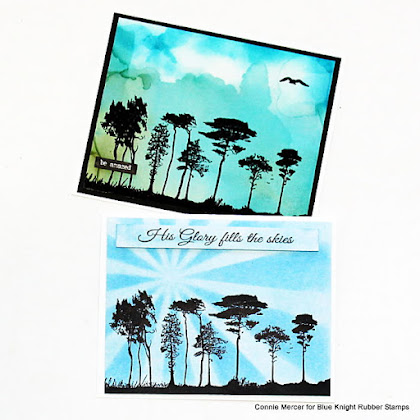

The top card, the background is created using Alcohol inks
and then the image is stamped over it using Stazon ink/ Black. A
word sticker is added along with the bird from Birds 2 and you have a
quick and beautiful card.
The bottom card is stamped on white cardstock using a stamping
 platform (to make sure you get good coverage from the silhouette stamp).
A stencil is added over the card front. Color is added with the
 Day/Night panpastels.  The sentiment is stamped and added to the
card front. 


Thanks for stopping by~
Connie/DT Member

Thursday, February 20, 2020

Make Art Sentiment stamp by Darkroom Door~

Hi guys!
Today I'm sharing a couple of cards created using the newly
released Make Art Sentiment Stamp by Darkroom Door.
The coffee card is created using glossy paper and alcohol inks. Drops of
blending solution is
 randomly placed to make really cool effects on
 the glossy paper.  The paint brush card is created using Distress Oxides to
add color to the card background.
Products used:
Darkroom Door: Make Art Sentiment stamp, Coffee Time, Med. Wellbeing Stencil,
Lots of Labels Set, Paint Splats and Artist Brushes.
Other: Glossy cardstock, Alcohol inks, Distress Oxides, Archival inks, Acrylic paint
Scrapbook Adhesives by 3L and silver pen.


Thanks for stopping by~
cm

Friday, March 1, 2019

Lucky Cows and Lucky Charms with Joy Clair!!

Hi guys!!
We are showcasing the Lucky Charm Stamp set by Joy Clair.
This is such a fun set.  I put a funny spin on it using the 4 leaf clover
 as my focal idea for my scrapbook page.  Take a look~

Most of the stamped images were stamped on white cardstock and trimmed out.
They were colored with alcohol markers.  The small clovers are stamped
 directly on the pattern paper and then colored in.  The images
 were arranged  and then adhered to the pattern with dimensional foam
squares.


The story of the cows and the clover :):) It's a good one~


Thanks for stopping by~
Connie

Monday, September 3, 2018

Notepads for teachers ~ Clear Scraps!!

Hi, Connie here with a cute and easy idea for those special teachers using embellishments by Clear Scraps.  Clear Scraps a great selection of chipboard, acrylic and mirror  embellishments.  They are super cute added to notepads. Let me show you what I came up with~

Embellishments1_clear scraps_C. Mercer
Instructions:
·  Notebook (from office supply store) 5" X 8" ~ have them cut  down the middle.  I usually buy the pack, that will give you 8 notepads.
·  Cut the pattern paper 3" wide X 10" long.
·  Fold the pattern paper over the top of the notepad, about 1 1/4".
·  Add a decorative edge with a border punch or steel die.
·  Adhere the notepad to pattern paper

Embellishments2_Clear Scraps_C. Mercer
Add color to the acrylic, chipboard and mirror embellishments.

Embellishments3_Clear Scraps_C. Mercer
The acrylic flower is colored with alcohol inks.  The mirror dragonfly is colored with alcohol inks.  The chipboard lizard is colored with embossing powder.  All embellishments are glued to the top of the notepads with Beacon 3-IN-1 all purpose glue.

Embellishments4_Clear Scraps_C. Mercer

Embellishments5_Clear Scraps_C. Mercer
To complete the projects, stamp a sentiment for the bottom of the notepads.

Embellishments6_Clear Scraps_C. Mercer

Supplies used:
Clear Scraps:  Acrylic Flowers, Dragonflies Mirror embellishments and Geckos Chipboard
Other:
Notepads (from office supply store)
Beacon
Alcohol ink and applicator /Ranger
embossing powder/Emerald Creek
Buttons Galore & More

Thanks for stopping by~
Connie Mercer/DT Member

Friday, February 24, 2017

Air Balloon Acrylic Layout by Clear Scraps!

Hi, Connie here with another, awesome,  new release by Clear Scraps.  If you are a scrapbooker you will love this Air Balloon Acrylic Layout.  This is one design, Clear Scraps has many different and fun Acrylic Layout designs.

Acrylic overlay_clear scraps_c.mercer
Alcohol ink was used on parts of the design.  Blue for the clouds and red for the air balloon.   The inks will run and it didn't bother me one bit:).  Just remember to remove the plastic from the acrylic before applying the ink. 

Acrylic overlay_clear scraps_c.mercer1
The acrylic layout was used as a guide only~ still leaves plenty of room to be creative.

Acrylic overlay_clear scraps_c.mercer2

Products used to create this page:
Air Balloon 12x12 acrylic layout

Thanks for stopping by~
Connie Mercer/DT Member

Saturday, July 21, 2012

Stick pins and buttons~storage solution~

I know you want to say~well that is great but how you going to keep track of the buttons and pins~that is keeping them together.  Well what about this~

The buttons were still wet last night so that is why I'm posting today. I did add a picture of the buttons on top to yesterdays post , so it is all there.  Start to finish!


Have a great weekend and I'll see ya soon.   I have a really fun Try It Tuesday!!
******so come back:):)******

Friday, July 20, 2012

Pins and buttons ~ colored with Tim Holtz's alcohol ink

Hi everyone~it all started with this idea.  I thought I would make some more colored pins, using the Tim Holtz alcohol inks and then it hit me.......why don't you color some buttons and then they will match when you use them on a layout or card.  So I did~

So I have my supplies out and ready, taking the lid off the ink with the mini needle nose pliers.

Three buttons done.  The ink dries fast. I found a Q-tip works better than painting the ink on with a paint brush.  It went on more even and faster.

Using the paint brush on the blue ~

The pins are turning out so cool and the buttons are matching~

Loving how the pins came out~I bought these pins from Hydrangea Hippo.


and this is how I will keep them together~I know you where all thinkin' that :):)
Well there you have what I did this evening {beside 2 loads of laundry and dishes}.  Hope you enjoy this and see how great the buttons took the ink~worked great!!!
***********************************************************
Had a great email late last night, telling me some Darkroom Door stamps where headed my way!!! Woot!!!
Can't wait!! See ya soon~