Showing posts with label Ukrainian Eatser Eggs. Show all posts

Friday, April 15, 2022

Past Easter Projects ~

Hi guys!!
Easter is almost here and I thought I would share 
some projects that were created celebrating the 
Easter Holiday.  You might recognize some of them. Oldies but
Goodies!!  


Blue Knight Rubber Stamps, Trinity Stamps (cup die) and
Scrapbook Adhesives by 3L.  Vintage Bunny book.


Stamps by Blue Knight Rubber Stamps.  Color is 
panpastels.


Topflight Stamps, Lavinia Stamps.


Egg shaped cards. Scrapbook Adhesives by 3L.


Easter treats. Joy Clair (stamps) and Scrapbook Adhesives by 3L.


Creating with a real (found bird nest) adding smalls eggs, vintage button
and stick pin. 


Blue Knight Rubber Stamps and Scrapbook Adhesive by 3L.


Joy Clair and Cutting Café.


Ukrainian Easter Eggs  

I have all the links to these company's in the side bar of
my blog. Thanks for stopping by and hoping for a 
GREAT EASTER celebration for you and your families.
See ya soon~
Connie

Tuesday, March 27, 2018

Try It Tuesday~Pysanky (Ukrainian Easter Eggs)

Hi!
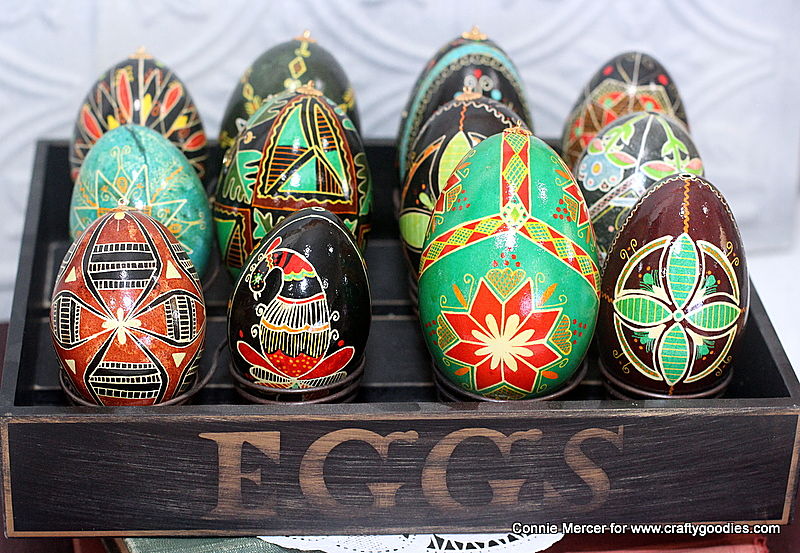
I'm going to attempt to give you an idea of how these beautiful Ukrainian Easter Eggs are created.  The ones I'm sharing with you were created over 20 years ago.  We were raising Ostrich, Emu and Rhea birds and I had friends with ducks and geese, so I had eggs.  A friend invited me to a class and I was hooked~
I could usually create two a day and still have supper on the table :). 

The best way to start something new is, buy the kit !!!!

The kit came with the dyes, the tool (kistka or stylus) and beeswax.  It also has some
 easy patterns for the eggs.
You will also need white vinegar, no.2 pencil, candle, varnish and drying rack (hubby made mine).

Drying rack along with an Egg Lathe.  The Egg Lathe is a device used to draw perfect horizontal lines around the egg.  This was a very useful tool when I started learning this craft.

Pure beeswax is the only type of wax used with the egg dying process.  The candle is used when you take the wax off, to reveal the designs on the egg.  It really is like opening a present!!

When I first started creating the Ukrainian Ester Eggs, I couldn't start an egg with a pattern, so that is why I have several books of patterns.  As I kept creating I was able to come up with my own designs.  I have listed below the steps in creating an Ukrainian Easter Egg.  Take in consideration the dye has been prepared ( different jars for each color) and beeswax and kistka is ready.

1. Blow the yoke out of the egg. Wash and let it come to room temperature. (You can do them the traditional way and not blow out the yoke.)
2. Place pencil lines, on the egg, dividing it into sections.
3. Apply beeswax to the basic lines.
4. Draw another pattern and then dip in the dye.  Using light color of dye first.
5. Continue the process until the egg is covered with wax.
6. Hold the egg over a candle and the wax will melt off reveling the egg.
The more you practice the better you will get.
7. Rub with varnish and place on the drying rack.
 I would do this at night so the eggs would have a good 8 hours to dry.


These are Rhea eggs~

These are duck, turkey and goose eggs~
Start out using chicken eggs and then look for a source for goose eggs.  They are bigger and give you more space to design with.

******************************************
I'm thinking of gearing up and doing this craft again ~
I'll keep you posted!!!
Thanks for stopping by!!!

Tuesday, April 19, 2011

Try it Tuesday~"Pysanky" Ukrainian Easter Eggs


In 1990-1991 we had a bunch of eggs on our farm.  We had so many Ostrich, Rhea, Duck, Goose and Emu eggs~I took a class at a local Art Institute and learned the art of pysanky.  It was love at first "art"!!


The Ukrainian people are famous for their colorful "Pysanky" Easter Eggs Pysanka is a form of egg decorating using a wax-resist method.  Legend has it that as long as Pysanka are decorated, goodness will prevail over the earth.  The supplies needed in making Pysanka are eggs(goose are the best), kistky(writing tool), candle, beeswax, dyes, spoons, egg rack and a working area~your not afraid of getting dye and wax on.


I am going to give you the short version of the process~make sure you are working with a clean egg~no marks or scratches.  Right from the bird is the best!  Mark your lines on the egg using an egg lathe or by hand. Use the kistky to apply the beeswax to the egg.  Dip your egg into one color of dye ~then repeat the process.  Apply lines on the egg, with a soft lead pencil, go over the lines with the kistky(holds the hot beeswax)~when that is done you are ready to dye the egg a second color.


You keep adding color until your entire egg is covered in beeswax.  This is the fun part.  Take your egg and hold it gently over the candle fire~the wax will start to melt off and you will have a beautiful colored egg.  Take a soft paper towel and wipe all of the beeswax off.  The next step is to varnish the egg ~using your hands.  Place the egg on the egg rack to dry~they look stunning in a glass tumbler or large glass bowl.  These that I have shown you are a mixture of Duck, Turkey and Goose eggs.


These are Rhea eggs~we were raising the birds at that time so eggs were plentiful!! Over the years the vibrant colors have faded but they are still beautiful.  All of the hours****sigh****that I sat and did these~time well spent!!


My story is not complete without showing you these eggs. They were done by my oldest son~he was a sophomore in high school and he made his own patterns for the eggs. It tickled me that he took interest in another one of my crafty endeavors.  Hope you enjoyed this post ~ please let me know what you think about my blog content. I have posted a blog poll and encourage you to vote!!! Have a fabulous Tuesday. I know I'm early!!!!
Thanks for stopping by!
Connie