Showing posts with label Altered. Show all posts

Sunday, December 19, 2021

Transfer Foil Sheets "On The Outside" with Scrapbook Adhesives by 3L~

Hi guys!
Today I'm sharing an "adhesive on the outside" project
using Metallic Transfer Foil Sheets and Adhesive 
Sheets 4X6.
  It is easy and fun!!
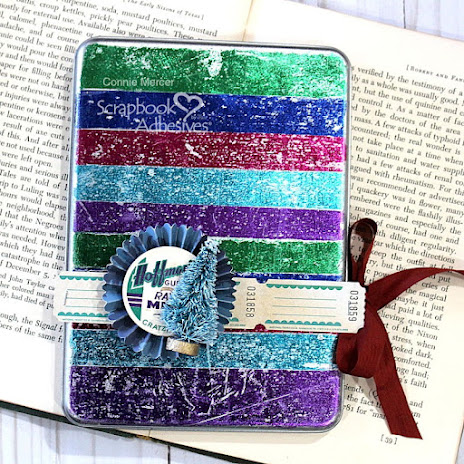

I have a tutorial over on the Scrapbook Adhesives by 3L Blog with
all the details.  All you need is two products and you can
cover a gift tin.  Any tin will work.  You put the adhesive on the "outside"
and then lay the foil over it. Rub and pull up.
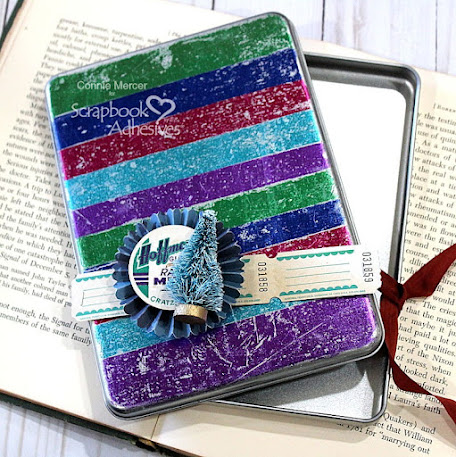

I have the details for the ribbon tie on the Scrapbook Adhesives by 3L Blog.
Check it out!!!
Thanks for stopping by
and a BIG Merry Christmas to All!
Connie


Creative Time: 40 minutes
Skill Level: Beginner

Materials needed:
Scrapbook Adhesives by 3L®
Metallic Transfer Foil Sheets/Variety
Adhesive Sheets 4X6
3D Foam White Circles Mix
Home Hobby by 3L®
Extreme Double-Sided Tape 1/2″

Other: tin container, ribbon, embellishments and Tim Holtz Tiny Attacher

Pin It!!!

Sunday, December 31, 2017

Top 10 projects of 2017~

Hi guys!!
I love posting my favorite projects at the end of the year and
 I hope you enjoy seeing them again!

#1 ~ Button cards for Buttons Galore & More

#2 ~ Butterly Shaker clip for Clear Scraps

#3 ~ Texas shaker and Star Shaker for Clear Scraps

#4 ~ Scrapbook page for Quick Quotes

#5 ~ Club Q for Quick Quotes

#6 ~ Scrapbook page for Quick Quotes and Canon

#7 ~ Project sponsored by DecoArt

#8 ~ Card using products by Darkroom Door

#9 ~ Scrapbook page using the new border stamp by Darkrom Door

#10 ~ Altered paint brush created for Handyman's Holiday Blog Hop with Debby Lewis
*****************************************
I'm taking some time off in 2018,  I'll still be around just not as many projects.  I hope to be back soon.  Thanks for all the support and interest in my creative expressions!!
Take care~

Thursday, October 5, 2017

Handyman's Holiday Blog Hop~

HI guys!!! 
Thanks for joining us for the Handyman's Holiday Blog Hop
Make the rounds and be inspired!
The challenge put before us was to alter a paint brush.  I've never tried that :) kinda of scary too.
But here we go. Hope you enjoy!!

I had such a fun time creating this.  I started out going in one direction and turned out doing completely different techniques and using different colors.  I wanted a shabby chic look and I think I accomplished that.
Gesso handle and then paint with color.

I used stencils and modeling paste to create texture on the handle. I added different colors of modeling paste, with my fingers, rubbing it into the grooves of the brush.  I kept doing this until I achieved the "look" I wanted.  You know the one~ when you say , that's it!!!

I wanted this altered paint brush to double as a pin board.  So I kept that in mind while
 I was creating. I needed a way to display the brush because I wouldn't be using the
 handle as a hanger (it would be upside down).
I came up with this~

 This is the way I will display my altered brush.  I can change out the photo but I really love this one. I "give thanks" for them every day. Such a blessing to us!!

 And here is a closeup of the embellishment collage~
Quick Quotes PowderPuff Chalk ink was used to shade the leaves and the "6" embellishment showcased on the front of the altered paint brush.  I used Helmar 450 to adhere the elements.

Products used:
DecoArt / gesso, modeling paste, paint.
Viva/modeling creme (orange, gold and cream color)
Stencils: Crafters Workshop, Clear Scraps.
Quick Quotes PowderPuff Chalk inks
Prima
Tim Holtz
Buttons Galore & More (in jar)
Maya Road/Ken Oliver embellishments 

***************************************
Next stop is Joan Borgelt ~ The Gov's Place.
If you get lost you can return to hop by going to D's Paper Studio.
****************************************
You can see the "Be Inspired Giftaway" (prize pack) at D's Paper Studio.
Four winners will be chosen from all the comments, on all the blogs, along the hop.
 Winners will be drawn via Random.org and announced on Tuesday, October 10th
 at D's Paper Studio.
A BIG Thank You to all of our our awesome Sponsors ~


Quick Quotes, Heartfelt Creations, Helmar and D's Paper Studio.
Thanks for stopping by~
Connie

Thursday, April 30, 2015

Quick Quotes & Petaloo~gorgeous together!

Hi, Connie here with an "off the page" project using the gorgeous flowers from Petaloo and the gorgeous papers and Powderpuff Chalk Inks from Quick Quotes.  So fun creating with these fabulous products:)


Instructions:
*Take an old muffin pan and using Tim Holtz's paper Rosette die (large) cut 6 rosettes out of Gypsy Road 300 and Gypsy Road 400, 3 of each paper.
* Ink the rosettes with Sunset PowderPuff Chalk Ink.
* Using 1/2" foam, adhere the rosettes to the center of each section in the muffin pan.
* Adhere the butterfly by Petaloo to each section of the muffin pan.


* Using the burlap trim, from Petaloo, create a center banner for flowers and the date.
* Wet glue or hot glue will work for this.
* Attach a favorite photo, to one of the sections of the muffin pan.


This is the muffin pan before I started altering it with the beautiful Petaloo and Quick Quotes products. You can see more inspiration, using the Petaloo flowers on the Petaloo Blog here.

Quick Quotes products used:
Gypsy Road 300
Gypsy Road 400
Gypsy Road die cut stickers
Sunset PowderPuff Chalk Ink

Other Products used:
Petaloo flowers and trims

Thank for stopping by~
Connie Mercer/ Quick Quotes DT

Saturday, August 10, 2013

Clear Scraps~***whoop***!!!

 
Hi everyone~If you didn't see my scrappy news, you can find it HERE~ oh, heck I'll just tell you.
I'm going to be working with another great company ~


I'm so looking forward to it!!!!!! 
This was one of my submissions~
The large acrylic birds are by Clear Scraps and the paper by Jenni!!!
I hope you will stop by the Clear Scraps blog and look at all the beautiful projects by the team~gorgeous stuff over there!!!
***********************************
I'll show you my other two submissions soon!!!
have a wonderful weekend~ 
see ya soon.
cm{heart}

Friday, January 4, 2013

Re-purpose project and layout with JBS!!


Hi everyone, I'm setting up blog posts because I'll be taking a week off for the holidays.  This is some JBS work that I did that you can see more in detail HERE!!!  I used the new line Boy meets Girl.  So cute!!!!


I love to alter old stuff and make it useful again. So much of it has so much character, just like this vintage album page.

This is a clock face that was altered into {what I call } a wisdon board. Just little things I would like to talk to my grands about!!! :):) A reminder for me~
You can see this blog post HERE!!!
***********

Friday, October 19, 2012

The best for last~

Hi everyone~I hope you enjoyed Blog week with Vintage Street Market and May Arts.  You still have one more day on the Jenni Bowlin Halloween Treats Blog Hop.  I have linked them just in case you missed all the inspiration!!!!  This was my final project I submitted for the Jenni Bowlin Ambassador call. I felt this was my best piece.   I did have some help though~but don't tell JBS:):)

The cat out ran the blue bird so I got some cool blue feathers to add to my project. :):) The spoon is stamped using metal stamps by Impress Art.
This is the Wren line {to date my favorite line}~gorgeous colors and images.  The project was designed and made with a heavy heart.  It is dedicated to my parents~they new where I wanted to go with my ART and supported that!!!  They are the BEST!!!!
********************************************************************
I found this in an old book at my mom's house the day after my dad's funeral~it speaks for it's self!!

*******************************************************
Tomorrow I'm getting my new computer set up and files transferred.  A sweet, sweet scrapping buddy is going to help me {or teach me }:):).  Then I can get the Silhouette going { another learning curve}.
You still have time to leave a comment HERE for the JBS Blog hop.  Winner will be announced Monday.  The Play Date Cafe is celebrating their 3 year anniversary~tons of inspiration and prizes!!!   Have a great weekend and I'll see ya soon!!!!

Wednesday, May 26, 2010

Altered "beer" Carrier

This was a carrier left behind in my pantry. I threw it in the trash and then I had that "light bulb moment"-you know the one, hey I can alter that and make a cool organizer for my favorite buttons!!! I used Star Buck Coffee jars for my containers. I used Glossy Accents to adhere the Jenni Bowlin milk caps to the lids!!
Here is a side view so you can see the "cool" dimension on the front. I put a bunch of vintage "goodies" on the front to decorate. The paper is Jenni Bowlin-most of this is Jenni Bowlin!!!

The finished piece!! Looks great on my scrappy table and love that my buttons are so close. Leave me a comment or become a follower and I will send a Jenni Bowlin "goody" to some lucky winner!!! I will draw at the end of next week. If you link me to your blog I will put you in twice!!! Make sure to leave me a way to contact you. Whoo hoo - lets get "crafty" ladies!!! Have a great day!!!!