Showing posts with label May Arts. Show all posts

Thursday, February 3, 2022

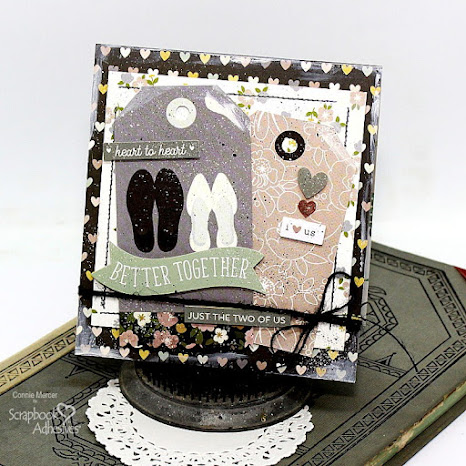
I Love Us Card with Scrapbook Adhesives by 3L~

 Hi guys!
Today I'm sharing a "I Love Us" Card using Simple Stories pattern paper
 and Crafty Foam Tape 108' by Scrapbook Adhesives by 3L.
They make lots of adhesive products that I love but this
one is special.  I use it on all of my projects!!!


I have a tutorial over on the Scrapbook Adhesives by 3L Blog with
all the details and step out photos.  I hope you will take a look~
This is a fun project and takes no time at all!!


Thanks for stopping by!
Connie / DT Member


Creative Time: 45 Minutes
Skill Level: Beginner

Materials Needed
Scrapbook Adhesives by 3L®
E-Z Runner Hearts Refillable Dispenser
E-Z Runner Grand Refillable Dispenser
3D Foam Squares Mix White
3D Foam Stripes
Crafty Foam Tape 108′
other: Simple Stories/Happily Ever After, Ranger/Perfect Pearls, Darkroom Door /Stitched Borders, twine and acrylic paint


Pin It!


Monday, March 9, 2020

Number Medley by Darkroom Door~

Hi guys!
I have a couple of cards to share using the newly
released stamp called Number Medley by Darkroom Door.
This is a fun stamp and goes so well with the stamps
in the Darkroom Door product line.  You guys need this set!!
If you love mixed media, must have set :)
I basically created the background using PanPastels (windmill card) and Distress
Oxide ink on the camera card.  Then I stamped the images from the Number Medley
set over the background.  I love the look it gives the cards.  Then stamp the focal
image (windmill and camera) to complete the card.
Products used:
Darkroom Door: Number Medley, Country Windmill,
 Make Art Sentiment stamp, Filmstrip stamp, Lots of Labels, Dream Big Sentiment stamp and Camera
Ink: Archival and Distress Oxide ink
PanPastels
Other: scrapbook Adhesives by 3L, twine.
Misti Plate form was used to get good coverage of ink on the windmill card.
Thanks for stopping by~
cm

Tuesday, February 17, 2015

Try It Tuesday~Telling Time with Bella Blvd. and Clear Scraps!

 Remember these "Telling Time" Flash Cards (from about 4 years ago) ~ I still think they are very cool and love to add them to projects.  I used the chipboard "Overall" piece from Clear Scraps and covered it with Bella Blvd. pattern paper, to make a door sign for a toddler's room.
The pocket holds the "time" cards~ Nap Time or Play Time.

Supplies used~
Label Punch~ Jenni Bowlin Studio
Pattern paper~Bella Blvd./Daily Chevies & Everyday Bits
vintage find~ flash cards
trim~May Arts
Alpha's~ American Crafts
*****************************************
linking at Lessology Challenge #44
*******Top 3 winner******


Thanks for stopping by~

Tuesday, June 17, 2014

Try It Tuesday~ the medicine cabinet!

Hi guys!!!!
Remember this old medicine cabinet from last year~ my mother in law bought it for$2 at a yard sale in her neighborhood~I finally got it re-purposed.  ( It has been hard, with the Spurs playing such great basketball ***wink****~NBA Champions 2014 !!!!)


The back of the cabinet was really damaged, so that was discarded and my work focused on the mirror frame part.
I also used these glass drawer pulls from other junkin' trips:):)


I plan to hang this in my bathroom for jewelry or scarves!!  I'll post when I get it hung ( hubby does these type of things for me:):), so might be awhile:)
Supplies Used:
Darkroom Door: chicken wire background stamp
Ranger: ink, paint
Trim: May Arts
Other: vintage knobs, rusty old key, original hinges
***********************************
Thanks for stopping by for 

See ya soon~


Tuesday, December 31, 2013

Try It Tuesday~flower pins!!

Hi guys!!!
I love the new burlap flower's by Canvas Corp.  Craft Crossing has them in stock and I have bought my share:):). I sure did have fun creating these for Christmas presents.

 This one is black canvas with some Maya Road, Prima and May Arts.


 The one on the left, has Tim Holtz beads dangling, sis owns this one!

 
 The one on the right is made with a flower by The Curtsey Boutique.  I added
gathered ribbon around it to make it larger. More Prima and Maya Road.


This one I gave to my mom. It has an antique shell ( gold script) pin in the center.  I bought it junkin but not at a junkin' price:):)
********************************************
Avocado Arts
is having their first ever Design Team call~you can find all the information on the Blog!!!


Saturday, August 10, 2013

Clear Scraps~***whoop***!!!

 
Hi everyone~If you didn't see my scrappy news, you can find it HERE~ oh, heck I'll just tell you.
I'm going to be working with another great company ~


I'm so looking forward to it!!!!!! 
This was one of my submissions~
The large acrylic birds are by Clear Scraps and the paper by Jenni!!!
I hope you will stop by the Clear Scraps blog and look at all the beautiful projects by the team~gorgeous stuff over there!!!
***********************************
I'll show you my other two submissions soon!!!
have a wonderful weekend~ 
see ya soon.
cm{heart}

Sunday, June 16, 2013

JBS, a bottle and Elle's Studio~

While on a nature walk back in 2009 I came across this bottle.  I took a picture of it but left it there, just like I photographed it.  Spring forward to 2013 ~ I went back to that exact place and the bottle was still there just like in the picture.. This time I brought it back to the house and cleaned it up.  It became a re-purposed project for Jenni Bowlin Studio.


JBS carries some really cool old labels in the Ephemera section of the Mercantile.  The label on this bottle is one of those.  I also used JBS feathers and butterflies.  The flowers are by Prima and the ribbon is by May Arts.

JBS is partnering with the fabulous Elle's Studio.  I have three more projects on the JBS Inspiration Blog.  You can see them HERE. Would love for you to stop by!!!

***************************
See ya soon for  


Tuesday, June 4, 2013

Try It Tuesday~remember this child's shoe form.

Hi everyone, it's that time again~ remember this photo from a few weeks ago~
 
It is a size 3 children's shoe form~I thought it would make a sweet photo stand.  It is kinda of rough but I love the primitive look to it.  

The first thing I did was form my wire.  You can wrap it around something small and round or just start twisting, like I do:):):) 

 When I get it shaped and test it to make sure it is tight and will hold photo's, I hot glue it in the metal hole on the top of the shoe form.  I hold it in place by threading the wire through a button and then glue to the shoe form.

After that all you do is decorate it.  I have about 7 of these type photo stands and at Christmas I'm going to line them up on the mantle with the grands pictures.  Each photo stand is unique just like my sweet grands!!

I used Maya Road, May Arts, Jenni Bowlin, Darkroom Door and Prima

If you have any questions, just ask away~
See ya soon~
*************

Tuesday, November 13, 2012

Try It Tuesday~junker post!!

Hi everyone~I've come to know junk is a GOOD thing as Martha would say:):):) I can not take credit for what I'm about to show you but I did put my spin on it.  I saw the original idea at a local craft show and I have seen a version on pinterest~
 
These are some of the supplies I used.  I also used Viva Inka-Gold to add color to the door knobs, a hot glue gun comes in handy, and fun embellishments.  Mine are by Jenni Bowlin, Vintage Street Market, May Arts and Canvas Corp.  It was hard for me to make them and then show you how with a picture~but I think I can walk through it.
 
The first thing I did was measure off a good 25 " of wire { a good strong wire} ~ sorry guys that's the best I can do on the wire~no label on what I used.
Then I just looped it three to four times like the photograph shows.
I then made it tight by cinching two of the wires together, so it will hold a picture or note card etc.
Then I took a Jenni Bowlin button (those worked the best) and threaded the wire through the holes.
If the wire hits the bottom of the door knob cut a bit off.  You want the button to sit on top and not move around.  I stuffed felt in the hole to make the wire tight before I hot glued.
 
 
I then added some extra color to the door knob using the Inka-Gold. You just put it on with your finger.  I added felt to the bottom because my door knobs were really rusty.
 
Here is another set. 
 
I still have four more to make ~I'm going to do these different, maybe Christmas style:):
***********************************************
The Christmas Splendor Blog Hop is through the 17th ( that is Saturday)~to be in for the prize make a comment HERE!!!
Thanks for stopping by today and I'll see ya soon~


Monday, November 12, 2012

Christmas Splendor Blog Hop~

Hi everyone~Welcome to the Christmas Splendor Blog Hop hosted by Angela Holt Designs!! Our awesome sponsor is Want 2 Scrap!!!! I hope you will take a minute and check them out~cool stuff and lots of it:):)


If you began here you will need to start at the beginning of the blog hope by visiting Angela's Blog first. Follow this link to begin the hop: Angela Holt Designs
I am second on the list so you are on track~
I love Christmas and I try every year to make homemade { same as handmade :):)}ornaments.  The "grands" are getting old enough they can make ornaments too!!
 
These ornaments are made from cracker jack boxes that were purchased in the 80's.  My sis gave them to me (she knows me all to well:))!! The popcorn had to be dug out, it was hard as a rock but look what cute and different Christmas ornaments the boxes made!!
 
 
 and of course bling makes anything look good!!
 
Here is the blog hop list ~ hope you will visit each blog.  I will be having a prize giveaway ~ just leave me a comment {on some cool vintage thing}, if you are a follower tell me in your comment and your name goes in twice~fair enough? Always perks for followers!!! I'll post a winner after the blog hop is over.  Please leave a way for me to contact you:):)
************************************************************
1. Angela Holt (Angela Holt Designs) http://www.angelaholtdesigns.com
2. Connie Mercer-- http://www.craftgoodies.com  *****you are here*****
3. Lorrie Simons-- http://www.pickledtinkcrafts.blogspot.com/
4. Tabetha Watson--http://www.tabethascreations.blogspot.com
5. Jan Hennings-- http://papercraftpleasures.blogspot.com
6. Michelle Well-- http://histrulybeloved.blogspot.com/
7. Dee Dee Carton--http://www.umwowstudio.com
8. Susan Brown--http://www.sbartist.com
***********************************************************
So this is what you can do with these~

see ya soon~
A friend emailed me and told me you can find these same boxes at wal-mart.   So maybe these aren't as old as I thought:):)


Thursday, November 8, 2012

Always learning something~

 
Hi everyone~ this is a fun project I did while in Florida at the Collins Group Convention.  The class was taught by 7gypsies and Canvas Corp.  I learned several new ways of distressing your paper.  One way is to fold it in 4ths, back and forth~it gives the paper a worn look and easy to tear pieces { to make a peeking window} that shows your underneath paper.  Curling the tips and corners is another way to give the paper an aged feel.
 
 
Some of the other girls in the class stamped all around the wood box~I loved the look  but never had a chance to do it to mine.  Next time, right~
The ribbon is by May Arts~learned how to crinkle and mist to get the color I want.  All you do is wet your ribbon {I used a spray bottle} and then I ran in through some pink Inka-Gold by Viva.  Scrunched it up and then let it dry.  I'm sure there are many ways!!!!
*******************************************************************
Thanks for stopping by today~I have lots to show you!!! See ya soon~