Showing posts with label Clear Scraps. Show all posts

Friday, December 27, 2024

Best of 2024~

Hi there!
Hope you all had amazing FAMILY time!!  We did!
Christmas is a special time of the year. We keep it simple and
soak up all the time with our family that we can! 
I was hoping for some creative time but that didn't
happen.  
Looking through my blog posts, for 2024, these nine were the 
favorites (by the number of page views).


I created for Blue Knight Stamps, Scrapbook Adhesives by 3L, Creative Worship,
Topflight Stamps, Clear Scraps and Buttons Galore and More
 (links are in the side bar).

Thanks for stopping by!!
Connie
crafty_mercer
Crafty Goodies Facebook Page

Monday, August 12, 2024

Texas Shaker Clip with Buttons Galore & More~

Hi guys!
Today I'm sharing a Texas Shaker Clip using
pretties from the Fall Monthly Subscription Kit by 
Buttons Galore & More (affiliate link)
called Harvest Kit


I assembled the Texas Shaker and painted the front edges, of 
the Texas frame, with acrylic paint. I added paper leaves, sewing
 buttons and novelty buttons from the Harvest Kit.
We just got back from vacation so this was so perfect!! Always
good to get back home.

You can use it as a clip to keep things together, close a bag of chips or
it is great as a book marker. 


A fun and easy project!! The Harvest kit comes with pretties to
make this so fun to create.  


I told you it will have everything you will need :):)
and more!!
Remember to get 10% off your button order by 
using CONNIE10 when you check out!! 

Thanks for stopping by!!

Connie
crafty_mercer
Facebook page: Crafty Goodies

Tuesday, July 16, 2024

Sleigh Memory - Dex by Clear Scraps~

H there!
 I'm so excited to share the NEW Sleigh Memory-Dex
 by Clear Scraps. They carry a selection of  Memory-Dex boxes
 along with the dividers, that go in the boxes.  You can
 design your own Memory-Dex with all the
fun Clear Scraps products. 


I have listed the supplies you will need to create the Sleigh
 Memory-Dex.
Supply List
Clear Scraps: Memory-Dex/Sleigh
Index cards: Vintage Chip 2
Vintage Acrylic 2
Scallop Chip 2
Scallop Acrylic 2
Chipboard Words: MERRY and CHRISTMAS
Border Stencil: Checker Board
other: pattern paper, adhesive (wet) and dry, scenery
stamps, greeting stamps, acrylic paint, Tim Holts
Paper Dolls, shape dies, color mediums (markers,
Pan pastels and colored pencils).


Instructions:
1. Trace the shape of the sleigh on pattern paper and cut out.
Do both sides of the sleigh plus the front and back rectangles between the sides.
2. Stamp the scene on both sides using Archival ink/ Jet Black. 
Using a stamping platform is helpful.
3. Adhere the sleigh cut out to the birch wood cut out. Do both sides.
Beacon Acid Free works great for this. Sand all edges with a sanding block.
4. Stencil the backside of both sleigh pieces using the Checker Board
stencil by Clear Scraps, using dark green acrylic paint.  Also paint
the end pieces with beige acrylic paint.
5. Add Beacon 521 to the edges of the sleigh and line up with
the notches to assemble the sleigh. If the sides are lined up with the
pre-cut notches it slips right in.  
6. Add color to the stamped scene on both sides using Pan Pastels, colored pencils
or markers.  Then shade the edges with Brown ink/Pan Pastel.
7. Paint the chipboard words (MERRY & CHRISTMAS) with dark green acrylic
paint and let dry.  Adhere in place.
8. Finish stamping extras for the scenes and then speckle with white
and black acrylic paint. Place the wood pegs inside and secure the ends with glue.


Index cards:
1. Cover the chipboard index cards with pattern paper and send edges.
2. Die cut Scallop or postage stamp shape for the acrylic index cards.  You
will need two for each acrylic index card. One for each side and secure.
3.  Attach the Paper Dolls to the chipboard index cards giving the appearance
they are on a sleigh ride.
4. The acrylic index cards have dimensional adhesive used to secure the shape.
This also gives a buffer between each index card.
5. Add the Christmas sentiment to the front of the index card cluster
and add twine for color.


Other products used: 
Stamps: Blue Knight Stamps: Chickadee in the woods, Buck, Doe & Fawn,
Horse and Sleigh and Pine and Distant Mountains. KazelKraft: Christmas
Sayings. Darkroom Door: Number Medley, Merry Mail and
Handwritten Ledger.  Adhesive: Beacon: Beacon Acid Free and Beacon 521.
Scrapbook Adhesives by 3L: EZ Runner Grand, 3D Foam Circles and 3D
Foam Strips. Medium: acrylic paint, Pan Pastels and Archival ink.
Tim Holts: Paper Dolls. Dies: Spellbinder: Scalloped Oval.  Kat
Scrappiness: Postage Stamp. Twine. Pattern paper: Echo Park:
My Favorite Christmas.

Thanks for stopping by!
Connie
crafty_mercer
Crafty Goodies Facebook Page

Monday, July 4, 2022

4th of July Inspiration~

Hi guys! 
I thought I would share some 4th of July inspiration from the past.
  I love creating patriotic projects and I love
supporting our service men and women in the military.

Thank You For Your Service


2015 ~ Jenni Bowlin print and Darkroom Door stamps.


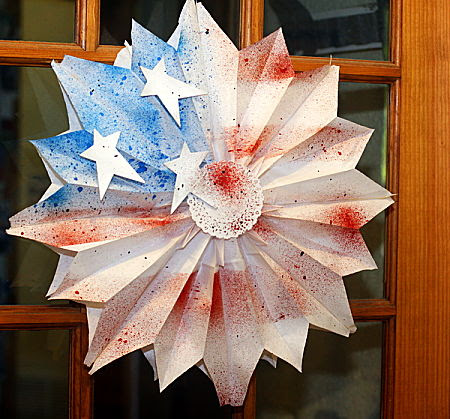
Paper Star made from white bakery paper bags. Spray painted
using chipboard stars from Clear Scraps.  2016


2017~ Card created using the Flag stamp by A Jillian Vance Designs.
The card was published by Stampington & Company in Take Ten.


Card created using stamps by Darkroom Door. 2018


Scrapbook page about heroes for Paper House Productions. 2019


Cards for Scrapbook Adhesive by 3L using stamps by
Darkroom Door. 2020


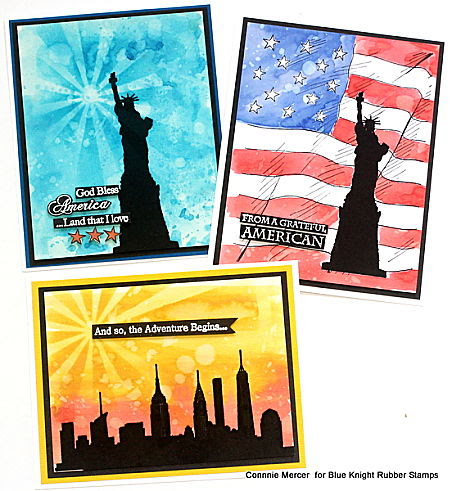
Liberty Silhouette stamps by Blue Knight Rubber Stamps. 2021


Created a tag for Scrapbook Adhesives by 3L using stamps by
Blue Knight Rubber Stamps and Darkroom Door. 2021


Created for Scrapbook Adhesive by 3L using stamps by
Darkroom Door.
All links to products can be found in the side bar by following the 
Company link.

Thanks for stopping by!
Enjoy celebrating Independence day.
We are Blessed as a Nation.
Connie

Thursday, September 9, 2021

Clever Fox by Blue Knight Rubber Stamps~

H guys!
I have a cute and Clever Fox to share with you
using Blue Knight Rubber Stamps.  If you love cute and
Foxes this is a win, win for you.


The first card is stamped on white cardstock with Archival /Jet black
ink. The background is Distress Oxide ink applied with a applicator.
It is then sprinkled with water for a distress look.  Two more flower were
stamped, colored and trimmed out and added to the card front. A checked
border was added using a stencil. The sentiment was added to
complete the card.
The second card a stencil was used in creating the yellow background.
Using a stamp platform, the sentiment and fox were all stamped
at one time.  The fox was colored in with Distress Oxide
inks.  Water was sprinkled for a distress look.  Twine was added to
complete the card.  The adhesive used for both of these cards is
by Scrapbook Adhesives by 3L.


  Would love to see you join us over on the
Thanks for stopping by~
Connie/ DT Member

Wednesday, April 14, 2021

Hello Spring by Blue Knight Rubber Stamps~

Hi guys!
All week the Design Team for blue Knight Rubber Stamps will be
sharing NEW stamps and guys they are fabulous.  I will be 
creating with Hello Spring.  A little
something for everyone!!

These cards are so whimsical and fun!!! The image is the
same I just created different backgrounds for each card.
Card #1~


This card was stamped on a yellow Distressed Oxide background with
a diamond  and circle stencil.  The stencils added that distressed look
that I so love. The image was stamped with Archival Black ink.  The image
 is colored in with Distress Oxide inks.  The sentiment is embossed and
 added to the card front.

Card #2~


On this card the top is Distress Oxide ink watered and applied
like a water color. The bottom is a checked border stencil.  I used Archival
ink for that.  This card has some acrylic paint for highlights.
I use Scrapbook Adhesives by 3L foam products for dimension.

  Would love to see you join us over on the
Thanks for stopping by~
Connie/ DT Member

Tuesday, February 25, 2020

Try It Tuesday ~ Mixed Media Canvas Bags!


Hi guys!
Thanks for stopping in for


I have been creating using, stencils, a 6" X 6" gel-press and paint. 
Love it so much!!!  A little messy, but tons of fun !


Load the Gel-Press up with paint, then doodle in it and stamp ~ that's
 how these were done.  Simple process getting the canvas covered
with color.  Stencils were added with black paint.  Border stencils
were used with white paint.  Details added with a liner brush to
highlight areas on the bag.


Buttons were hand sewn on the front of the bags.  Trim added in the
zipper pull.  

Try it~ ok?
You will love the process and the really cool thing is, it is
really hard to mess up :)
Products used:
Canvas Bags: Amazon
Gel-Press (affiliate link)
Stencils: Darkroom Door, Clear Scraps,  DecoArt/Andy Skinner, 
Stencil 1 and The Crafters Workshop
Paint: DecoArt
Buttons Galore & More
May Arts/ seam binding

Tuesday, December 31, 2019

Seasons Givings Blog Hop 2020 ~

Hi guys!!
I'm so happy to be participating in this blog hop that is for the
soul purpose of thanking YOU the people that visit our blogs!
A little background on the Seasons Givings Blog Hop ~ this is the
 8th year for this wonderful event hosted by Latisha Yoast.
********WINNER********
I'm following your blog. You only need 3 more to hit 500. You go girl. I'm looking to make more shakers. Some easy method that I can understand. I also, like your candy bar wrappers. So, I'm interested to different projects other than cards but cards are my first love. Thank you. Go Cowboys!  

Giveaway Details!


To enter:
  • Follow my Blog  (I would love to have 500 followers) OR
  • Follow me on Instagram  ~ crafty_mercer  (do both make 2 comments for 2 entries)
  • Comment and tell me how you are following.  Make sure I can contact you. Tell me what kind of projects you are interested in creating and viewing.
Contest ends on Mon, 1/7/20 at 11:59 pm CST. Winner will be announced on Tue, 1/8/20.
USA only.
 Thanks for understanding! 
 
Blog Hop List~

Here is a few of my favorite projects that were created in 2019~


Thank you for stopping by and
enjoy the Seasons Givings Blog Hop because
it is for YOU!!

Monday, December 30, 2019

Top 10 projects of 2019~

Hi guys!
Lets count them down the top 10 projects of 2019~
lets go.......
no. 1
Art journal page with Clear Scraps~my favorite art journal page,
 the colors, stencils it just all came together:)
no.2
Loved how this card evolved. Using stamps and a stencil by Darkroom Door.
no.3
These small church cards using Joy Clair stamps and stencils by
ARTplorations/Helen G. ~ the perfect mix of mixed media.

no.4
This was a fun time with buddy~creating super hero paper figures.
Using Paper House Productions products.

no. 5
Love everything about this card~ created using Blue Knight Rubber Stamps.I even asked myself, "did you really create that"?

no.6

My first project for Scrapbook Adhesives by 3L. Loved the background and the
 great adhesives:)

no.7
I had a dream about this design~loved how they came together.
Using stamps and stencils by Darkroom Door.
no.8
Using stencils from Clear Scraps, Stencil 1, The Creative Workshop 
and Darkroom Door. Fun project! 

no.9
Art journal page using stamps by Joy Clair ~ loved the blue green
color tones together.

no.10
Created with Blue Knight Rubber Stamps and a stencil by Darkroom Door.
*******************
January 1st Crafty Goodies will be in a Blog Hop that is all about
thanking our blog visitors (that is YOU). Every blog you visit will have a give away
and chances to win prizes.
 I hope you stop by on January 1, 2020 for the
Seasons Givings Blog Hop.

See ya soon~
cm

Wednesday, December 18, 2019

Canvas Bags~mixed media style!

Hi guys!
I made these for two special friends of my moms~
I hope they love them.  I had such a great time creating them.
I used  a bunch of different stencils from my stash!
The Gel Press was used with DecoArt paint to create the background
for the bag.   The stencils were applied with paint and a small sponge.

After the paint dried the iron was used to heat set the paint.

Supplies used:
DecoArt paint
Gel Press
Stencils: Darkroom Door, Clear Scraps, The Crafter's Workshop, 
Stencil 1 and Dylusions/Ranger.
Canvas bags were bought on Amazon.
Other: buttons, antique trim

Thanks for stopping by~
Merry Christmas to all!!