Showing posts with label Fall. Show all posts

Thursday, October 12, 2023

Rural Mailbox by Blue Knight Rubber Stamps ~ NEW!!

Hi!
Today I'm sharing the NEW Rural Mailbox Stamp
by Blue Knight Rubber Stamps.  If you
love coloring you will love this stamps. It
screams "color me"!!! 


The top card is colored with Panpastels and colored pencils.
I added the pumpkins from the Lamp Post Stamp set. The
sentiment is the NEW wonderful./One Line Sentiment stamp.
It is a Fall/Holiday sentiments set.  Love it!!


The bottom card is colored with Panpastels and
Distress Oxide inks.  I water the oxides down
and treat them like water colors. It is a very forgiving
 medium.  


Both cards are using the NEW wonderful./One Line
Sentiment 
for the card greeting.  All adhesive
is by Scrapbook Adhesives by 3L.

Connie/DT Member
@crafty_mercer

Thursday, October 5, 2023

Waving Wheat by Blue Knight Rubber Stamps ~ NEW!!

 Hi!!
Today I'm sharing a NEW release stamp by Blue Knight Rubber
Stamps called Waving Wheat.  It is gorgeous!!!  


The top card is using the Maple Leaf Stencil by 
Blue Knight Rubber Stamps to create a background for
the Waving Wheat image.  I used Distress Oxide inks
to add color to the stencil and then stamped the Waving
Wheat
over the background using Archival ink. The 
sentiment is added and then speckled with acrylic paint.


The bottom card is created using the Dictionary Page
Background Stamp 
by Blue Knight Rubber Stamps.


I used Archival/Walnut Brown and then then stamped 
the Waving Wheat over the Background with Archival/ 
Black ink.  The sentiment is added and vintage trim
and buttons for a eclectic look.  All adhesive is
by Scrapbook Adhesives by 3L.
 

Thursday, May 25, 2023

Maple Leaf Stencil & Stamp Thru Set by Blue Knight Rubber Stamps~

Hi all!
Today I'm sharing the Stencil & Stamp Thru set called
 Maple Leaf  by Blue Knight Rubber stamps. This is the last
 one for this month.  Rumor has it, a new release is coming .


Both of these cards are blended using Distress Ink.  I just bleneded
with different color pallets.

I used the thicker stensil on this card and then stamped the
image in the middle. So the thin stencil was not
needed.  I used Silhouette Sportsmen and One Line 
Sentiments/friends rock. 


 This card it was stamped thru on the blended area so the
thin stencil was placed over the blended area (Maple Leaf).  
I used Branches & Leaves and One Line Sentiments /
Sincere Condolences.
 to complete the card.
Twine was added to both cards.
All adhesive is by Scrapbook Adhesives by 3L.


Thanks for stopping by!
Connie/DT Member
@crafty_mercer

Thursday, November 3, 2022

Creating a Plaid Background with your Adhesive on the Outside ~ Scrapbook Adhesives by 3L

 Hi!
I have been seeing this technique around so I thought I
would give it a try.  Pretty easy and loved the 
results.  It is taking the E-Z Runner Grand Repositionable
Dots Dispenser
by Scrapbook Adhesive by 3L to create a
plaid look for the background of the card.


Basically you are putting the adhesive down and rubbing it off.
I have all the details over on the Scrapbook Adhesives by 3L
Blog. 
I hope you will take a look ~ it's a fun one.


Thursday, October 20, 2022

One Line Sentiments/happy any day. with Blue Knight Rubber Stamps~

Hi!
My third Fall card, for Blue Knight Rubber Stamps, is 
using the One Line Sentiments/happy any day. I also
included Buck, Doe & Fawn and Cute Koala.
I loved how this card came together~


The background is created with watered down Distress Oxide inks.
The card stock is run through the ink to create a messy background
for the card.  The leaves are stamped out on white cardstock, colored with
Distress Oxide and then cut out.  The leaves are from the Cute Koala set.
The Buck is from the Buck, Doe & Fawn set.  The One Line Sentiment
 / happy any day. is stamped on the messy background.  Using a stamping
platform makes for a great image. 
The Buck is stamped on a piece
 of the messy background and then punched out with a large circle punch.


The sentiment "let's go" is embossed with white extra fine
embossing powder.  
All adhesive is by Scrapbook Adhesives by 3L.


Thursday, October 13, 2022

Train Tracks with Blue Knight Rubber Stamps~

Hi!
My second Fall card for October, using stamps by
Blue Knight Rubber Stamps, is Train Tracks.  I kind of 
switched it up a bit~ 


I also have included Lampost, Rear View Truck and
  One Line Sentiments/ happy any day.
in the design of this card.  I created a mask to put over the 
train tracks while I was inking up the stamp.  The mask was removed
before the image was stamped on the card front.  The truck and pumpkins
 (in the back of the truck bed) were stamped and cut out.
They were colored with Distress Oxide inks.  I used a stencil over the blank
train tracks to make it look like a rocky road.  The road was
 colored with panpastels.  The sunset is created from a large circle stencil.


Adhesive is by Scrapbook Adhesive by 3L.

Thanks for stopping by.
Connie/DT Member

Thursday, October 6, 2022

Tractor Card with Blue Knight Rubber Stamps~

Hi!
For the month of October I will be sharing Fall
themed cards using Blue Knight Rubber Stamps. 
Today I'm using the Tractor set along with the
Bark Background stamp, Sloth (for the leaves) and
One Line Sentiments/lucky you. & happy any day. 


The Bark Background was stamped with Archival ink and colored
with Panpastels. The leaves were snagged from the Sloth set, stamped
and cut out.  They were colored with Distress Oxide inks (watered down).
The Tractor is stamped out and colored with Distress Oxide inks also.
The little pumpkin, in the center of the sentiments, is hand drawn
 and cut out.  I call it a little messy pumpkin  The sentiments used are from
 the One Line Sentiments collection.


The images are added, to the card front, and adhered with
adhesives by Scrapbook Adhesives by 3L.

Thursday, March 10, 2022

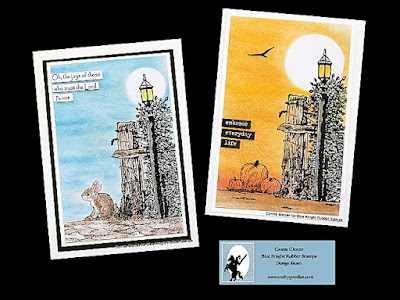
Lamp Post by Blue Knight Rubber Stamps~

 Hi guys!
I have a couple cards to share using the new
stamp from Blue Knight Rubber Stamps called Lamp Post.
It come with 3 different add on stamps making it
usable for all seasons.


The top card is colored with panpastels and colored pencils. The stone
slab (under the bunny) is the Bark Background stamp.  I just inked up the top
of the stamp (didn't even put it on a block) and stamped a stone
slab for the bunny to sit. 
The bottom card is showcasing another extra image you get in 
with the Lamp Post set, the pumpkins.  I used the Sunset/Sunrise panpastels
to create a sunset.  The pumpkins are stamped with black Archival
ink.  Word stickers are added for the sentiment.
All adhesive is by Scrapbook Adhesives by 3L.


Thanks for stopping by~
Connie

Check out Blue Knight Rubber Stamps on the web!!

Monday, October 11, 2021

Hand Carved Pumpkin Stamps Make Cute Cards~

 Hi guys!!
I know it is October and everyone wants to see 
"scary" but how about pumpkins?  I created with hand
carved pumpkin stamps and created three different cards.  No
Jack-O-Lanterns either ~ just plain ole' pumpkins.

Let me show you~


I had the best time creating these.  Different but so FUN!!
These cards were created was publication but they didn't 
get picked :(:(.


"Stay Simple" card name
Stamps: Blue Knight Rubber Stamps: Girls with Pets
Darkroom Door: Lots of Labels , Grunge Marks
Hand Carved stamps: pumpkin, sm. leaf
Adhesive: Scrapbook Adhesive by 3L


"Be Original" card name
Stamps: Blue Knight Rubber Stamps: Rear View Truck,
Beach Fences, Birds 2, Silhouette Forrest
Hand Carved stamps: pumpkin, sm. leaf
Adhesive: Scrapbook Adhesive by 3L


"Grateful Heart" card name
Stamps: Blue Knight Rubber Stamps: Silhouette Corner
Leaves.
Darkroom Door: Fallen Leaves Background Stamp
Hand Carved stamps: pumpkin, sm. leaf
Adhesive: Scrapbook Adhesive by 3L


This one made the magazine :):) RubberStampMadness


Thanks for stopping by~
Oh, btw I carved those pumpkins stamps:):)
Connie

Monday, August 23, 2021

Creative Scrapbooker Magazine ~ Fall 2021

Hi guys!
Have you picked up the current issue of Creative Scrapbooker yet?
Well I'm here to tell you it is a GREAT fall issue.
Lots of scrapbook pages and lots of cards~ and that is where
I come in at, the cards part.


I had two cards published using Scrapbook Adhesives by 3L and Joy Clair Stamps.
Heck, you might even remember them. Turkeys!!! 
Not sure if these stamps are still available, you would have to check it
out!! But I sure love those Turkeys!


Thanks for letting me gush!!!
Connie

Saturday, October 26, 2019

Fall cards with Joy Clair and Leisure Arts~

Hi guys!!
It is my turn on the Joy Clair Blog!
I created some fallish (is that a word) cards that make me ready for some
 cool weather and football. 
These cards were created by using the markers as a mixed media type ink.  I scribbled the ink on a non stick mat and added a small amount of water and dabbed the ink on the watercolor  paper.  I dried the paper with a heat tool after each color.  I just kept layering colors (from the markers) until I got a fallish mix of color. Something a cool November day would be proud of.  The images form the Fall, family & Football stamp set were stamped out and colored in with the dual tip markers by Leisure Arts.   
The images were adhered to the card front with Dimensional adhesive and then double matted on coordinating cardstock.  The cards are 3" X 4" /small great for gift bags are football goodies! 

The second card is created using the same technique except I used Distress Oxides inks instead of the dual tip markers.  The background was created the same.  The images were water colored with Distress Oxide ink.  The images were adhered to the card front with dimensional adhesive/foam squares. The card front was double matted on coordinating cardstock and then adhered to a folded card.  This is a 3" X 3" card so it is perfect for a gift bag or used as a card on some game day treats!
Thanks for stopping by~

Thursday, November 2, 2017

Creating a background with Clear Scraps~

Hi, Connie here with another stencil project. I'm using the 12" Twig Leaves, by Clear Scraps, to create the background for a scrapbook page.  The page is about Montana Pumpkins, so I used the 6" Pumpkin stencil too.  Great way to create embellishments for your page.

Clear scraps_Twig stencil_c.mercer

I used PowderPuff Chalk inks by Quick Quotes to color in the open parts of the 12" Twig Leaves stencil.  I used makeup sponges to grab the chalk ink and apply it to the stencil.  Works really well.  Using a makeup sponge will give you a clean crisp stenciled background.

Clear scraps_twig leaves stencil_c. mercer

I added several different Fall colors to give the look of the Fall leaves changing.  After the background was created, the paper was squared up and mounted on two other sheets of cardstock.

Clear scraps_pumpkin stencil_c.Mercer

Using the 6" Pumpkin stencil, the shadow lines are stenciled in first, then remove the stencil and color in the pumpkin with the chalk inks.   The image was then trimmed out and adhered to the scrapbook page.

Clear scraps_pumpkin stencil1_c. mercer

I used the Pumpkin for my title spot and embellished it with  twine and a button.  After the journal area was complete and the photos adhered the page was splattered with brown ink for extra interest.

Supplies used:
Clear Scraps: 12" Twig Leaves stencil
Clear Scraps: 6" Pumpkin
Other:
Quick Quotes PowderPuff Chalk ink
Beacon 527 all purpose
Buttons Galore & More
Divine Twine

Thanks for stopping by!!!
Connie Mercer/DT Member

Monday, October 2, 2017

A Fall Wreath using word stencils by Clear Scraps~

Hi, Connie here with a really fun project, using the word stencils, by Clear Scraps.  I used the "Thankful" word stencil and applied it to an old board, to use on a fall wreath project.  It was easy and looks amazing!!! All you need is a board, acrylic paint, sand paper and the stencil.  Simple, right?

Clear scraps_word stencil_c. mercer

The sign board is painted with green acrylic paint, then sanded ( you can seal with a mat sealer, if you like) and then stenciled with off white acrylic paint.  I use makeup sponges to apply the paint.  I dab off and then apply to the stencil.  Another tip is to tape the stencil in place using painters tape.  Can be bad if the stencil is moving around on you. After the board is painted and the stencil work is complete, sand lightly to give the sign a vintage look and feel.  Wipe with a dry rag.  This would be the time to seal the sign if you are hanging it outside.

Clear scraps_word stencil2_c. mercer

When using it in a wreath, holes will need to be drilled on both sides of the sign so it can be attached with wire to the wreath.  Sounds hard but it is not.   Looking forward to hanging it on my backdoor.  I would love to have a sign for every season and then make a wreath using it.  Got to make that happen~

Clear scraps_word stencil3_c.mercer

Clear Scraps has twelve word stencils, that measure 3" x 12", so perfect for sign making and other craft projects.

Supplies used:
Clear Scraps: Word stencil " Thankful" 
Other:
acrylic paint
sanding block
makeup sponges
board

Thanks for stopping by!!
Connie Mercer/DT Member

Monday, November 7, 2016

Leaves in a Jar Card with Clear Scraps and Darkroom Door

Hi guys!!!
I have a card for you showcasing the Jar Frame stamp by Darkroom Door 
and the Fall Leaves 12" stencil by Clear Scraps.  I love combining "like" products to create with.

The background is created using three different inks, stamped randomly on the rubber stamp and then stamped on the cardstock.  The leaves are stenciled on white cardstock and cut out.   More leaves are stenciled inside the jar ( and that was stamped on white cardstock and cut out).

Supplies used~
Clear Scraps: Fall Leaves 12" stencil
Darkroom Door: Jar Frame stamp, Fallen Leaves Background stamp, Tag set and Brushed Sentiments
Twine: Divine Twine/Whisker Graphics
Ink: Archival/Ranger and Tumble Dye/S.e.i.

This is not a sponsored post, just me creating with awesome products!!
Thanks for stopping by~

Monday, October 31, 2016

Celebrating Fall with Darkroom Door!

Hi guys!
I have a fall card to share, using one of my favorite stamp sets, by Darkroom Door.  My favorite time of the year is fall, the leaves dropping and changing, but most of all the colors of the leaves.
Showcasing the  Carved Leaves Vol 2
These leaves look amazing stamped in fall colors, cut out and clustered
 together, just like they fell from a tree.  That was the look I was going for!

Other supplies used:
Darkroom Door stamps: Frame/Film, Brushed Sentiments, Photography and Carved Leaves Vol.2.
Archival ink by Ranger, S.e.i. Tumble Dye/Black, Wink of Stella, Authentique paper and stickers.

This is not a sponsored post, just me creating with some awesome stamps!!!
Thanks for stopping by~
cm

Thursday, November 26, 2015

Leaves & Petals with A Jillian Vance Design.

Hi guys!
It is my turn on A Jillian Vance Design.  Here is a little peek look
 at my card.  The leaves are really fun to make.  It was hard to stop :)

The gorgeous leaves are the Leaves & Petals Die Set from A Jillian Vance Design.
They look lovely down the center of a table.  Take a look~


To see the details on the card and other inspiration from A Jillian Vance Design
 go HERE.
Have a wonderful Thanksgiving with your family~
Thanks or stopping by~
Connie