Showing posts with label stencil. Show all posts

Tuesday, July 21, 2026

Creating Mixed Media Cards with Tracy Evans Stamps ~Topflight Stamps!

Hi there!
Today I'm sharing a set of cards using the New
stamps from Topflight Stamps by Tracy Evans. I love them all!!


I created an ink mix for the background. I used Distress Oxide (
 peacock feather, iced spruce and broken china)
 and Distress
Ink (mowed lawn) for this. This is two different 
cards but created at the same time.  I just started stamping!!! I'm
using Dog Rose & Butterfly by Tracy Evans, AALL & Create/
Tracy Evans #994 and Paper Artsy/PS456 stencil. To complete the 
cards I splattered with white acrylic paint. 


Same two cards just more views and showing the
products I used.  The tag is added to the top left card. It is by Paper Artsy
EM150.  The sentiment words are EM149.

Thanks for stopping by!!!!
Connie
crafty_mercer 

Monday, September 23, 2024

He said Art Journal Page with Creative Worship Stamps~

Hi there!
Today I'm sharing an Art Journal Page using the
Refresh My Soul set by Creative Worship Stamps.  I was
inspired by our recent trip to Sedona Arizona. The cactus
 was perfect!!! 


Coloring the page is the starting point.  I use Distress Oxide inks and add
in the colors.  The cactus images are stamped, colored and then trimmed out.
I set those aside until I'm finished with the background.


The words are mostly stamped out but the bible verse is computer
generated.  When all my pieces are colored and ready I start
adhering the images to the art journal page.  When it is
complete I go back in with more stamps and stencils.


Thanks for stopping by!!!

Connie
crafty_mercer
Crafty Goodies Facebook Page

Tuesday, July 16, 2024

Sleigh Memory - Dex by Clear Scraps~

H there!
 I'm so excited to share the NEW Sleigh Memory-Dex
 by Clear Scraps. They carry a selection of  Memory-Dex boxes
 along with the dividers, that go in the boxes.  You can
 design your own Memory-Dex with all the
fun Clear Scraps products. 


I have listed the supplies you will need to create the Sleigh
 Memory-Dex.
Supply List
Clear Scraps: Memory-Dex/Sleigh
Index cards: Vintage Chip 2
Vintage Acrylic 2
Scallop Chip 2
Scallop Acrylic 2
Chipboard Words: MERRY and CHRISTMAS
Border Stencil: Checker Board
other: pattern paper, adhesive (wet) and dry, scenery
stamps, greeting stamps, acrylic paint, Tim Holts
Paper Dolls, shape dies, color mediums (markers,
Pan pastels and colored pencils).


Instructions:
1. Trace the shape of the sleigh on pattern paper and cut out.
Do both sides of the sleigh plus the front and back rectangles between the sides.
2. Stamp the scene on both sides using Archival ink/ Jet Black. 
Using a stamping platform is helpful.
3. Adhere the sleigh cut out to the birch wood cut out. Do both sides.
Beacon Acid Free works great for this. Sand all edges with a sanding block.
4. Stencil the backside of both sleigh pieces using the Checker Board
stencil by Clear Scraps, using dark green acrylic paint.  Also paint
the end pieces with beige acrylic paint.
5. Add Beacon 521 to the edges of the sleigh and line up with
the notches to assemble the sleigh. If the sides are lined up with the
pre-cut notches it slips right in.  
6. Add color to the stamped scene on both sides using Pan Pastels, colored pencils
or markers.  Then shade the edges with Brown ink/Pan Pastel.
7. Paint the chipboard words (MERRY & CHRISTMAS) with dark green acrylic
paint and let dry.  Adhere in place.
8. Finish stamping extras for the scenes and then speckle with white
and black acrylic paint. Place the wood pegs inside and secure the ends with glue.


Index cards:
1. Cover the chipboard index cards with pattern paper and send edges.
2. Die cut Scallop or postage stamp shape for the acrylic index cards.  You
will need two for each acrylic index card. One for each side and secure.
3.  Attach the Paper Dolls to the chipboard index cards giving the appearance
they are on a sleigh ride.
4. The acrylic index cards have dimensional adhesive used to secure the shape.
This also gives a buffer between each index card.
5. Add the Christmas sentiment to the front of the index card cluster
and add twine for color.


Other products used: 
Stamps: Blue Knight Stamps: Chickadee in the woods, Buck, Doe & Fawn,
Horse and Sleigh and Pine and Distant Mountains. KazelKraft: Christmas
Sayings. Darkroom Door: Number Medley, Merry Mail and
Handwritten Ledger.  Adhesive: Beacon: Beacon Acid Free and Beacon 521.
Scrapbook Adhesives by 3L: EZ Runner Grand, 3D Foam Circles and 3D
Foam Strips. Medium: acrylic paint, Pan Pastels and Archival ink.
Tim Holts: Paper Dolls. Dies: Spellbinder: Scalloped Oval.  Kat
Scrappiness: Postage Stamp. Twine. Pattern paper: Echo Park:
My Favorite Christmas.

Thanks for stopping by!
Connie
crafty_mercer
Crafty Goodies Facebook Page

Wednesday, July 10, 2024

Fruit Tag with Shaker Elementz by BGM ~

Hi there!
Today I'm sharing a mixed media tag using Shaker Elementz 
by Buttons Galore & More (affiliate link) for a tag border. 
I'm using bits and pieces to cover the scallop border
of the tag.  


Using Distress Oxide inks, along with stamps and stencils, to 
create a mixed media background for the tag.  Extra fruit 
images were stamped, colored and trimmed to use on the front
of the tag.


The sentiments are stamped, trimmed out and added to the 
tag front. A fabric tie is added, to the top of the tag, and a mini
bottle, filled with Shaker Elementz (SLM116), is tied to the fabric, 
along with buttons from the Sun & Surf Box.


The scalloped border is covered with Shaker Elementz (SLM116)
using wet glue.  To complete the tag it is speckled with
white acrylic paint. All adhesive is by Scrapbook Adhesives by 3L.

CONNIE10 will get you 10% off your button order HERE (affiliate link).

Thanks for stopping by!
Connie
crafty_mercer
Crafty Goodies Facebook Page

Wednesday, January 3, 2024

Bring in the New Year with Scrapbook Adhesives by 3L~

Hi,
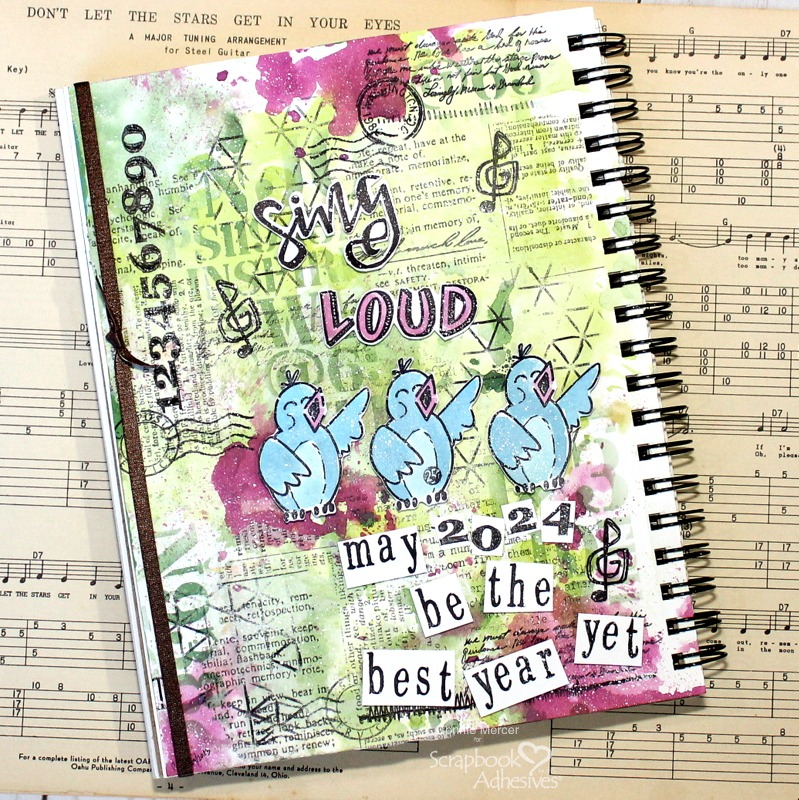
Today I'm sharing an Art Journal page using the 
awesome 3D Foam products over on the 
Scrapbook Adhesives by 3L Blog.


I had such a fun time creating this page  My inspiration came
from the birds.  Sing Loud, Best Year Yet, hoping it 
sticks:):)


First build a background for the page.  I use Distress Oxide inks.
Then decide what you want to say and how you want to
say it:). Always the hard part for me.  I look for inspiration to
get this part done. I found it in the birds.

Then the elements are stamped, trimmed and ready to adhere
to the page.  Added stamps and stencils to the background also.
I have all the details over on the Scrapbook Adhesives by 3L
Blog.  I hope you take a look and make a page for 2024!!


Thanks for stopping by!
Connie
crafty_mercer


Creative Time: 60 mins
Skill Level: Intermediate

Materials Needed:
Scrapbook Adhesives by 3L®
3D Foam Strips3D Foam Squares Micro White3D Foam Strips Large3D Foam Squares White Mix
E-Z Runner Permanent Strips Refillable Dispenser
HomeHobby by 3L
Dual Tip Glue Pen

other: Ink: Ranger: Distress Oxide, Stamps: Sweet n’ Sassy, Stencil: Sweet n’ Sassy, (Text Background, Geometric Background, Mini Grunge Type Alpha, Many Stitches, Going Postal, Sing Loud and Birthday Word Art Stamp), Misti 12″.

Pin It!!

Tuesday, August 22, 2023

Believe in Yourself Card with Sweet 'n Sassy Stamps~


Hi all!
Today I'm sharing a card created using SNS-18-057
Thrill of Hope set by Sweet 'n Sassy Stamps.  I live
 on a ranch and we have deer all around us
so this stamp set really spoke to me.  One image is all 
you need along with the perfect words!


The card background is created with SNS-13-054 Typewriter Text
Background stamp, SNS-18-030 Texture Tiles 2 and craft stencil: 
Mixed Up. 
I used Archival/black for the Typewriter Text and
 Distress Oxide ink for the texture stamp.


I used Archival/black for the craft stencil: Mixed Up.  The words
are embossed on black cardstock using SNS-14-004 God is
Bigger Stamp set.  I added dimensional adhesive to the backs of
 the embossed word strips.  Love the look!!! This card is about 5"x5".
All adhesive is by Scrapbook Adhesive by 3L.


Thanks for stopping by!
Connie
@craftymercer 

Friday, August 4, 2023

Mixed Media Card Set with Sweet 'n Sassy Stamps~


Hi all!
Today I'm sharing a set of cards using the  Mixed Up Stencil, by
Sweet 'n SassyStamps, to create a background for two
matching cards.


The stencil is a 6"x6" so it was perfect to make one print and
cut down the middle for a two card mixed media set.  I
really love the green, blue and purple Distress Oxide (watered down
to create a mix) for the card background.


I also used SNS-12-0368 Nature Silhouettes, SNS-14-004 God is
Bigger, SNS-21-003 Going Postal (super fun set) and SNS-13-054

Typewriter Text Background to create the mixed media look.


Tip: The soupier the ink mix is it will make for a really cool
card background.  Put the color on it layers.  Let each layer dry 
then add another ink color.  Finish the look by adding twine
and a greeting.  All adhesive is by Scrapbook Adhesives by 3L.

Thanks for stopping by!
Connie
@craftymercer

Tuesday, June 29, 2021

Mixed Media Tag for Topflight Stamps~

Hi guys!
It is my turn on the Topflight Stamps Blog. I have a #10
manila tag all messy (in a cool way) up with some awesome
products by PaperArtsy and friends :):)


This was really fun to create!! I'm using the newly released 
stamp set by Sara Naumann (ESN52) and the PS248 stencil works
great with the stamps.


I have all the details over on the Topflight Stamps Blog. I hope
you will check out Sara Naumann. You won't be 
disappointed.  Good Stuff!!!!

Products used:


Thanks for stopping by
 and 
just for you
get 12% off by using the code
conniemercer at the Topflight Stamps Store.
Connie

Tuesday, June 1, 2021

AALL & Create is at Topflight Stamps~

 Hi guys!
It is my turn to share on the Topflight Stamps Blog.
I have created a card using cool products by 
AALL & Create.  Did I mention REALLY cool.
There are so many to choose from, I want them all. :):):)
I created with #26 / Paint Brushes, #3 Washi tape and #114 
Art stencil.


I have all the details over on the Topflight Stamps Blog.  I hope you
will check it out and visit the store to get a look
at these really cool stamps.


Friday, May 1, 2020

Small Brick Stencil by Darkroom Door~

Hi guys!
I have a couple of cards to share using the Small Brick Wall
 stencil by Darkroom Door.  It is perfect for cards and just
the right size too!


Just playing around for two different looks.  Distress ink was used on the
 car card and Distress Oxide on the bottles card.  The small brick stencil
works well with larger images. Stencils make for an easy and quick
card.  Wish I had invented them:):)

Products used: Darkroom Door: Make Art Sentiment set, Bottles, Stars, 
Classic Cars Vol.2, Alpha Jumble stencil.
Other: Distress Oxide ink, Distress ink, Archival ink and
Scrapbook Adhesives by 3L.

Thanks for stopping by~
Connie

Tuesday, April 28, 2020

Path to the Barn by Blue Knight Rubber Stamps~

Hi guys!
I have a couple of cards to share with you using the Path to the Barn stamp
by Blue Knight Rubber Stamps.  This is a fun one, so easy to add
small stamps on the "path".
Card#1~
On this card the sunset was created with PanPastels and then the barn
and other elements are colored in with PanPastels also.  The sentiment
 was added and adhered to the card front.
Card#2~

This card is showing the adding of small stamps to
the path.  This was colored in with PanPastels and re stamped
to insure dark, crisp lines.

The clouds were added using the cloud stencil that works great with
PanPastels.  The smaller stamps are added using a Misti or
stamping platform.  Makes it easy to repeat stamping to get a rich
black color.
Products used:
Blue Knight Rubber Stamps: Path to the Barn, Cowboy Minis,
Walk by Faith, Family is Everything and Cloud Stencil.
Ink: PanPastels, Archival ink, VersaFine Clair/Nocturne
Adhesive: Scrapbook Adhesives by 3L
.
  Would love to see you join us over on the

Thanks for stopping by~
Connie /DT Member

Friday, April 24, 2020

Silhouette Corner Foliage by Blue Knight Rubber Stamps~


Hi guys!
 I have a couple cards to share using the Silhouette Corner Foliage 
stamp by Blue Knight Rubber Stamps.  Such a cool stamp.
Even though the foliage is in one corner, the stamp can be moved
around to a different angle to create a different look.
Card#1 ~
I created the sunset first using PanPastels and then stamped
 over the background of the card.
Using a Misti or stamping platform makes it easy to repeat stamping
of the image to insure a crisp and rich image.

Card#2
The background on this card was created using Distress Oxide ink in blue tones.
The stencil reminds me of an arbor ornament for Ivy's to grow on
.  The stamp was turned up side down to get the top leaves stamped.
I love a pretty Ivy stamp. So many uses~
Products used:
Blue Knight Rubber Stamps: Silhouette Corner Foliage
Ink: PanPastels, Distress Oxide inks, VersaFine Clair/Nocturne   
Adhesives: Scrapbook Adhesives by 3L
Stencil: Paper Artsy/Sara Naumann
  Would love to see you join us over on the

Thanks for stopping by~
Connie/DT Member

Thursday, April 23, 2020

Numbers Jumble Stencil by Darkroom Door~

Hi guys!
I have some projects to share using the Numbers Jumble Stencil
by Darkroom Door.  This is a medium size
stencil that is great for card making and mixed media
projects.
I used white Distress Ink on the black page with white embossed
week day stamped images.  The beige page is created using
Distress Oxide inks and Distress Ink for the stencil work.
The stamped images are stamped on mixed media paper and
trimmed out. Dimensional adhesive is used to secure images
to art journal page.
On both of these card examples, the stencil is used to create the
background for the card.  Distress Ink and Distress Oxide inks were
used. The images are colored in with Distress Oxide inks.
Products used:
Darkroom Door: Pocket Watch, Seven Days, Everyday Life,
Grunge Marks, Alphabet Medley, Lots of Labels,
Portrait Inchies, Candles, Happy Birthday Sentiments,
Cupcake, Small Birthday Stamp and Big Numbers.
Other:Scrapbook Adhesives by 3L, Distress Ink, Distress
Oxide Ink, Archival ink, embossing powder and white gel pen.

Thanks for stopping by~
Connie