Showing posts with label easter. Show all posts

Friday, April 15, 2022

Past Easter Projects ~

Hi guys!!
Easter is almost here and I thought I would share 
some projects that were created celebrating the 
Easter Holiday.  You might recognize some of them. Oldies but
Goodies!!  


Blue Knight Rubber Stamps, Trinity Stamps (cup die) and
Scrapbook Adhesives by 3L.  Vintage Bunny book.


Stamps by Blue Knight Rubber Stamps.  Color is 
panpastels.


Topflight Stamps, Lavinia Stamps.


Egg shaped cards. Scrapbook Adhesives by 3L.


Easter treats. Joy Clair (stamps) and Scrapbook Adhesives by 3L.


Creating with a real (found bird nest) adding smalls eggs, vintage button
and stick pin. 


Blue Knight Rubber Stamps and Scrapbook Adhesive by 3L.


Joy Clair and Cutting Café.
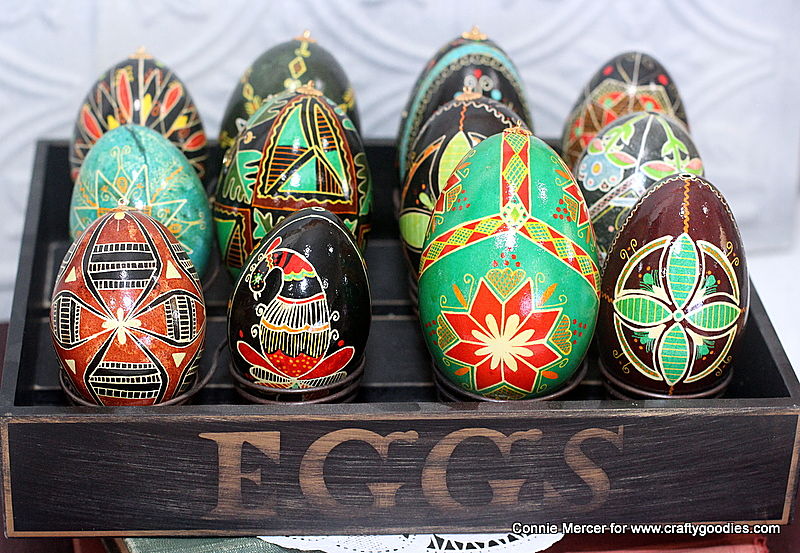


Ukrainian Easter Eggs  

I have all the links to these company's in the side bar of
my blog. Thanks for stopping by and hoping for a 
GREAT EASTER celebration for you and your families.
See ya soon~
Connie

Sunday, April 3, 2022

Easter Notepads with Scrapbook Adhesives by 3L ~

Hi guys!
I have a fun project to share using the Premium Double
 Sided Tape 1" from HomeHobby by 3L
 over on the 
Scrapbook Adhesives by 3l Blog today.
  So perfect for these Easter notepads!  All you need to start
is a half a sheet of pattern paper.  A full sheet will get you two
notepad covers.


I have ALL the details, the information about the notepads
that go inside, the embellished tags, it's all there.  Plus two 
more designs. Four notepads in all!!


So gather your supplies and head on over to Scrapbook Adhesives by 3L
for a step by step tutorial on creating these cuties.  Perfect craft night
project for the kids!! Have the kids make the tags exclusive to them.

Thanks for stopping by~
Connie/DT Member

Skill Level: Intermediate
Creative Time: 60 minutes (making 4 notepads)

Materials Needed:
Scrapbook Adhesives by 3L®

3D Foam Squares White Mix
3D Foam Circles White Mix

Home Hobby by 3L®
Premium Double Sided Tape 1″
Dual Tip Glue Pen

other: Pattern Paper: Doodlebug Designs, Stamps: Lavinia, Inkadinkado, Stampabilities, A Muse Art Stamps, Twine: white, Ink: Distress Oxide inks, Archival, Dies: Spellbinders (for sentiments). Tags: white.

Pin It!


Thursday, March 10, 2022

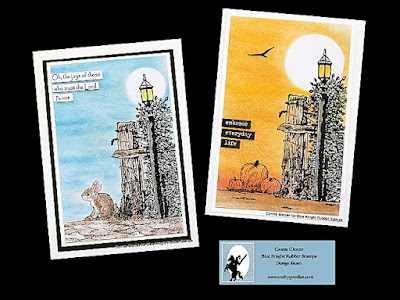
Lamp Post by Blue Knight Rubber Stamps~

 Hi guys!
I have a couple cards to share using the new
stamp from Blue Knight Rubber Stamps called Lamp Post.
It come with 3 different add on stamps making it
usable for all seasons.


The top card is colored with panpastels and colored pencils. The stone
slab (under the bunny) is the Bark Background stamp.  I just inked up the top
of the stamp (didn't even put it on a block) and stamped a stone
slab for the bunny to sit. 
The bottom card is showcasing another extra image you get in 
with the Lamp Post set, the pumpkins.  I used the Sunset/Sunrise panpastels
to create a sunset.  The pumpkins are stamped with black Archival
ink.  Word stickers are added for the sentiment.
All adhesive is by Scrapbook Adhesives by 3L.


Thanks for stopping by~
Connie

Check out Blue Knight Rubber Stamps on the web!!

Friday, April 3, 2020

Egg shaped cards with Scrapbook Adhesives by 3L ~


Hi guys!
Today is my turn on the Scrapbook Adhesives by 3L Blog.
I have a couple of Egg shaped cards to share that are
fun and easy to make. I was inspired by fellow DT member, Teri Anderson, and her Faux Paper Tape Technique post. She used paper strips to design a card front so why not a Egg shaped card.
So I started with that~

I have all the details with step out photos on the
Scrapbook Adhesives by 3L Blog.  I hope you will take a look.
 These are really fun and easy to create.
From this~

to this .

Products used:
Scrapbook Adhesives by 3L:
3D Foam Circles Mix White
Crafty Foam Tape 108ft.
E-Z Runner® Grand Dots Repositionable
Adhesive Dots Small

E-Z Runner® Grand Permanent Strips
other:
Patterned Paper: Authentique Papers; Cardstock; Twine; Buttons; Stamps; Black Ink; Distress Oxide Inks
Thanks for stopping by~
Connie


Thursday, March 19, 2020

Pillow Boxes with Scrapbook Adhesives by 3L~

Hi guys!
It is my turn on the Scrapbook Adhesives Blog today.
I have created some Easter themed pillow boxes using some
pretty powerful adhesives.  Always easy to create when projects stay
together!!!
To decorate the boxes I pulled out my scraps of paper and trim and started there.
I used stamps for the Bunny and the sentiments.  The boxes are stuffed with Easter
 grass and candy.  However for the non-candy people these make great
cash or gift card boxes.
Products used:
Scrapbook Adhesives by 3L Adhesive Dots 3D, 3D Foam Squares Black Mixed
HomeHobby by 3L: Dual Tip Glue Pen, Extreme Double Sided Tape 1/8" and
Extreme Double Sided Tape 1/4"
other: Joy Clair Stamps/Easter Gathering, Authentique Pattern paper, Kraft
Pillow Boxes and trim
Thanks for stopping by~
cm

PIN IT!!!


Monday, March 4, 2019

Pallet Art with Clear Scraps!

Hi guys!!
 It's my turn over on the Clear Scraps Blog today.
I am sharing a super cute Bunny Pallet shape painted and ready for Spring.
These pallet shapes are so fun and quick to create.  Great for special events!!
Good thing Clear Scraps has many different shapes!

I have all the details on the Clear Scraps Blog.  
Hop (get it) on over there and check it out.
Product list:
Clear Scraps: Lrg. Bunny Pallet
Clear Scraps: chipboard Kite embellishment
Clear Scraps: 6' plaid stencil
acrylic paint
paper ribbon
Beacon 527

Thanks for stopping by~

Tuesday, February 26, 2019

Hosanna In the Highest~a card with Joy Clair!

Hi guys!!
It is my turn on the Joy Clair's Blog today.  I am showcasing the Hosanna set
 that was newly released in January.  
Joy Clair released 13 new stamp sets that are so creative and
 fun to use for card making.


The Palm leaves are stamped on the card front with black archival ink. The leaves are colored in using Distress Oxide ink watered down. The background is created using Distress Oxide inks that are watered down to make small puddles of color.  That makes it easy to turn the card front over (to the front side) and pick up color.  I kept during this until I was happy, with amount of color for the background.

The word HOSANNA was stamped out on white cardstock using Distress Oxide ink and embossed with a clear coat embossing powder.  The word is matted on brown cardstock with a torn off edge. Ric rack and a button were added for texture. 


All the details are on the Joy Clair blog
Thanks for stopping by~

Friday, March 23, 2018

Easter Decorations~

Hi!
I have a few decorations to share with you today.  The first ones
 are made from pressed paper and are really old, about 1940.  They are super duper cute!!


They are beat up some but you would be too if you had survived
 that many years packed away in an attic.  I'm thinking they were little treat baskets.  On
 the bottom, of each, is a boys name and then, the other, a girls name.  

They are painted and the paint has chipped off in places.

The eyes are painted and have a small seed bead in the center.

I love these types of containers, the metal bin drawers.  They are fun and primative
 looking when you add content to them.  I switch them around for different holidays.
Favorite decorating container!
************************
Thanks for stopping by and have a great weekend!!!

Tuesday, April 18, 2017

Try It Tuesday~ vintage truck display!

Hi guys!
Time for Try It Tuesday :)
Remember this truck?


This is such a cool vintage piece.  It also makes a very unique display piece.
 A conversation starter for sure~
I don't have the information I wish I had on this truck, I'm guessing the 40's.
Anyway this is how I used it this past weekend~

Yep, real eggs too!  Can't wait to do a Christmas display using this old truck.
Thanks for stopping by~

Thursday, April 13, 2017

Easter Shaker Basket with Clear Scraps!

Hi, Connie here with a cute idea using the Bucket Shaker by Clear Scraps.  By using different embellishments the Bucket Shaker can easily become an Easter Basket.  The Easter Basket is displayed on a vintage Easter book that was given to me by a friend.  Super cute table center piece for Easter.

Bucket shaker_clear scraps_c.mercer
I used pattern paper on the inside of the Bucket Shaker (soon to be Easter Basket)  and then painted the frame with acrylic paint.  To achieve the crackle effect, apply crackle paint over the acrylic paint.  When it is dry you will have a lush, vintage looking finish on the frame of the shaker.

Bucket shaker_clear scraps_easter_c.mercer
The chipboard Easter word was given the same finish as the frame but a darker acrylic paint was used on the word.  Both acrylic paint colors are in the pattern background paper of the shaker.  The inside was filled with sequins by Clear Scraps. 

Bucket shaker_clear scraps_sequins_chipboard word_c.mercer
In this photo you can really see the gorgeous crackle on the frame and chipboard word.  I love the look!! Beautiful and so easy to achieve.  It would love great hanging from an Easter Basket.

Bucket shaker_clear scraps_chipboard word
One last photo with the Easter Shaker displayed on a neutral background.

Products used:
Clear Scraps: Easter chipboard word. Bucket Shaker and Sequins/Ocean  & Princess
Paper: S.e.i.
Buttons: Buttons Galore & More
Other: crackle paint, acrylic paint ( two shades of blue), Easter grass, vintage flowers and chain.

Thanks for stopping by~
Connie Mercer/DT Member

Tuesday, March 22, 2016

Easter Egg cards with Quick Quotes!

Hi, Connie here with a fun Easter Egg Card tutorial using the border strip papers from several collections by Quick Quotes.  I used  Whistlin' Dixie 100 and Anchors Aweigh 101 to make these cards.  All you need to know is how to draw a large egg shape.


Here is a quick tutorial~
So easy even the little peeps can do this.  
#1. You will need a 12" X 12" sheet of border strip pattern paper. Quick Quotes has several to choose from.
#2. Fold the pattern paper in half, long ways, making the paper 6" X 12".  Draw the egg shape on white copy paper and cut it out.  Lay it about a 1/2" over the fold of the pattern paper.
#3. Clip the egg pattern to the pattern paper and cut it out.  You will have an egg shape card that opens.  Decorate the front.  Use Quick Quotes PowderPuff  Chalk Inks to shade the edges of the card.
So fun to make and will look super cute in an Easter Basket!

Products used:
Quick Quotes PowderPuff Chalk Inks: Aqua, Seabrook

Other products:
A Jillian Vance Design
rubber stamp
Wink of Stella

Thanks for stopping by~
Connie Mercer/DT Member

Saturday, April 19, 2014

Blessings to you and yours~

Hi!!
Wishing you all " Blessings"~
 
See ya soon~

Tuesday, April 15, 2014

Try It Tuesday~The Curtsey Boutique, Easter Treats!

Easter is fast approaching and The Curtsey Boutique has some really cute bakery bags that can easily be made into treat bags.  Here is one I made using the Kraft Bakery bag.

The seam binding ribbon, doilies and white tags are also found in the Etsy shop.  The rubber stamp is by Inkadinkado.   The shop is always adding new items and they are handmade or embellished.
Take a look:):)
**************
See ya soon~
 

Sunday, March 31, 2013

Easter greetings~

Have a wonderful day and enjoy your Easter ~
I'll be back for Try It Tuesday with Darkroom Door!!!