Showing posts with label StazOn ink. Show all posts

Thursday, February 24, 2022

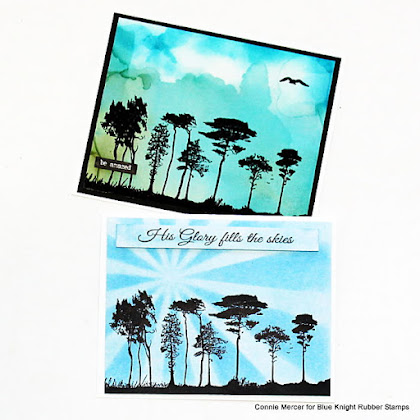
Coastal Pines by Blue Knight Rubber Stamps~

Hi guys!
Today I'm sharing cards made using the Coastal Pines stamp
by Blue Knight Rubber Stamps It is an easy stamp set to work with 
and is universal for any occasion. 


The top card, the background is created using Alcohol inks
and then the image is stamped over it using Stazon ink/ Black. A
word sticker is added along with the bird from Birds 2 and you have a
quick and beautiful card.
The bottom card is stamped on white cardstock using a stamping
 platform (to make sure you get good coverage from the silhouette stamp).
A stencil is added over the card front. Color is added with the
 Day/Night panpastels.  The sentiment is stamped and added to the
card front. 


Thanks for stopping by~
Connie/DT Member

Tuesday, May 19, 2020

Try It Tuesday~old photos used for book covers!

Hi guys!
I was gifted a box of old photos (8 x 10), black and white
mat photos~ really cool!!!!
I thought they would make really cool note book
covers.  I had some old composition note books that
needed an update, so that is where I started.

Supplies needed:
Adhesive, stamps, stencils, Stazon ink or Archival and washi tape.
Old photos (scenery type) ~ best source for this junk store.
 I always see them there with cheap prices too.
 I'll post links at the bottom of the post of brands I used.
#1. Showing types of photos that work great.
#2. Showing you I have lots!!
#3. Removed old pattern paper from front and back of composition
book.  Cut salvage off of 8 x 10 photos and corner rounded R side corners and
L side corners for back side.
#4. I used Extreme Double-Sided Tape  1/4" by Scrapbook Adhesives by 3L
to secure the old photo to the front of the composition book.
#5. I used stamps and stencils (Darkroom Door and Blue Knight Rubber Stamps)
 to add interest to front of book.
#6. Label was adhered with Crafty Foam Tape 108' by Scrapbook
Adhesives by 3L.


I used the same supplies on this except I added the Cowboy Minis
 by Blue Knight Rubber Stamps.
.
These composition books have been around for many years~2009 for one
 of them and 2012 for the other one.  One of them is a list of every blog
post I have made on my blog and the other for publications and
 Design teams I submitted to.  These two notebooks show all
the disappointments and the cheers!!! 
A journal page using one of the old photos!!!
Just Try it!!!
Thanks for stopping by for 

cm

Tuesday, June 25, 2019

Try It Tuesday~ Mixed Media Canvas Apron!

Hi guys!
 I have a really fun project to share. Mixed Media and with lots of paint!
Our insurance agent gave hubby a canvas apron to use when he grills. 
I got a hold of it before hubby did and did "my thing" on it.

I started with all these fun colors, stencils and one stamp!
I started by adding color to the apron using Tumble Dye's by S.E.I.
I then added stencils with modeling paste. More stencils with acrylic paint
Brush work with acrylic paint.  Just kept adding until I got
the look I was wanting.  I still think I could of added stronger color to
the apron before I started applying stencil work.


The stencils were applied in random spots using different colors of paint. A sponge
was used to apply the color.


Products used:
S.E.I. Tumble Dye
DecoArt/acrylic paint and modeling paste
StazOn ink
Clear Scraps/stencils
Darkroom Door/stencils
Dylusions/stencils
Jenni Bowlin Studio/stencils
Canvas Corp.
Blue Knight Rubber Stamps/cowboy and dad image

Thanks for stopping by~

{{{{This isn't a sponsored post just me creating with some
awesome products}}}}

Monday, February 11, 2019

Classic Cars Vol.2 part 2 by Darkroom Door~

Hi guys!!
Happy Monday!!  I have the other two Classic Cars Vol.2
projects ready to share with you.  Darkroom Door really hit a homer on this set.
So cute, great for guys!!!


Instructions:
1. Create a background using layers and layers of random colors of acrylic paint.  Mine started out as a page that I had cleaned the roller from the Gel-Press on.  It has hints of pink and purple under the green and yellow tones.
 I dulled that with the black paint. 
2. Add texture to the pages with stencils and modeling paste.  The white modeling paste applied over paint kinda of takes on the colors of the paint and I lost the look I was going after.
3. So I re-applied the stencil using acrylic paint.  The paint stayed white and I loved it on the black painted spots on the pages.
4. The sides of the pages were stamped with Stitched Borders set, giving the look that the pages were stitched with a sewing machine.
5. The center was created by stamping the car images on vintage dictionary paper with black ink. When the journal was closed the center paper tore apart. 
6. Stickers were added and stamped with StazonOn/black ink. (The stickers have a shiny surface and I wanted to make sure the text was not going to smear.)
7. Add speckles with black ink over the vintage dictionary paper.
8. Shading was added to the center, where the paper tore.
9. Vintage photo corners were added to the vintage dictionary paper.

Products used:
Darkroom Door; Classic Cars Vol.2 & Vol.1
Darkroom Door: Stitched Borders
Darkroom Door; Vintage Office
Darkroom Door: Lrg. Mesh Stencil
Ink: Archival/Jet Black
Ink; StazOn/Black
Paint: DecoArt
stickers


Instructions:
1. Using the Torn Text background stamp and gray cardstock, stamp the image on the cardstock with black ink.
2. Using the Lrg. Mesh stencil apply in random spots, on the card front, using black ink.
3. Do the same thing with the Lrg. stars stencil, random spots on the card front with black ink.
4. Stamp the car on a smaller piece of gray cardstock and apply the Lrg. Mesh stencil in random spots with black ink.
5. Matt the smaller piece on black cardstock.
6..Adhere to the card front.
7. Stamp sentiment with black ink on white cardstock and trim out.
8. Shade with black ink and adhere to card front with dimensional foam squares.
9. Speckle with white ink.
10. Add card front to a folded white card base.
11. Add three rhinestones to each star on the front of the card.

Products used:
Darkroom Door: Classic Cars Vol.2
Darkroom Door: Torn Text background stamp
Darkroom Door: Lrg. Mesh stencil
Darkroom Door Lrg. Stars
Cardstock: Letter It by Ranger
Cardsock: White
Ink: Archival/Jet Black and Dylusions/White Linen by Ranger
Other: black rhinestones

If everything goes good I'll have my Sketchbook Project up for 
Thanks for stopping by!!

Wednesday, June 6, 2018

Birch Wood Notes Folder with Clear Scraps~

Hi, Connie here with a cute project using the Birch Wood Notes wood shapes by Clear Scraps.  The wood shapes are great for making note books as well as cards.  It comes with two pieces of Birch Wood that make a perfect front and back for any type project.  Here is what I came up with~

Clear Scraps_birch wood1_C. Mercer
Finished cover~

Clear Scraps_birch wood2_C. Mercer
Inside of finished cover~

Instructions below:


1. Cover both of  the backs of the birch wood pieces with felt or wool material.  Use a strong wet glue.
2. Cut one long piece, so the felt will act as a hinge, for the folder to fold.
3. Trim off excess felt with scissors.  Cut a slit in the bottom, felt covered, birch wood piece. Use a cardboard guide, so the line is straight for the note pad to slide in.  The note pad will need to have a cardboard lip, on the back, in order to do this method. 
4. Slide note pad into slit.


Clear Scraps_birch wood4_C. Mercer

       5.  Apply Distress Oxide ink to the front and back birch wood pieces.  Lay the ink pad directly on the birch wood and rub it all over until the color covers the birch wood.   Easy and no mess!

Clear Scraps_birch wood5_C. Mercer

       6. Emboss chipboard Hearts Lock and then stamp with Jet black StazOn ink using a script stamp.
       7.  Using the same script stamp and ink, stamp on the front cover of the birch wood piece.
       8.  Finish the cover by adding ribbon and a key.  Speckle with irResistible Texture spray.  It won't bleed into the wood.
The project is easy and makes a beautiful gift!

Supplies used:
Clear Scraps:  Birch Wood Notes wood shapes
Clear Scraps: chipboard Hearts Lock
Other:
Distress Oxide/Antique Linen
Darkroom Door /Script Texture
StazOn/Jet Black
IrResistible Texture Spray/Black
Beacon
gold embossing powder
vintage trim, antique key, vintage wool or felt

Thanks for stopping by~
Connie Mercer/DT Member

Friday, August 18, 2017

Faith wall hanging with Clear Scraps~

Hi, Connie here with a mixed media project using the "Faith " stencil by Clear Scraps.   Just using the supplies, I had on hand, it was fun to create this wall hanging,as a special reminder, to keep the "faith".
Clear scraps_mixed media_faith stencil_c. mercer
The background was created using a gel press and acrylic paints on a 6" X 12" piece of canvas.  After the background was good and dry. the stencil was placed over the background print and using StazOn ink the word "faith" was added.  Highlights were added, with acrylic paint, to each letter.   The canvas was attached to a stick (from the yard). Again just using what is available to me :) 

Clear scraps_mixed media_faith stencil1_c.mercer
Fancy trim and lace were glued to the bottom, of the canvas, along with a cluster of buttons.   A ribbon stringer was created, for the side, and tied to the top of the stick with hemp twine.  More buttons added also.  This would also look great hanging from a door knob or vintage cloths hanger.  Clear Scraps has twelve word stencils, that would make beautiful home decor projects.

Thanks for stopping by~
Connie Mercer/DT Member
Thursday, June 29, 2017

June tag with Clear Scraps!

Hi, Connie here with my June tag using acrylic and a bunch of cute embellishments by Clear Scraps.  The embellishments are made using stencils by Clear Scraps. So easy!! Just stencil on white cardstock and trim out. Add dimensional adhesive to pop them up and super cute!!!

Acrylic tag_clear scraps_june tag_c. mercer
The background is created using  the 6" Anchor and Helm stencil with StazOn ink.  The acrylic tag was sanded first, giving a frosted look and then stenciled.  The Helm chipboard piece is by Clear Scraps.   Added color to the chipboard using StazOn ink.

June tag_Clear Scraps_chipborad_c.mercer

Products used:
Clear Scraps: Acrylic tag
Clear Scraps: 6" Ocean Friends, 6" Beach Fun and 6" Anchor and Helm stencil.
Clear Scraps: Chipboard embellishment: Helm/Anchor.
other:
StazOn ink, Lawn Fawn stamps, Beacon Quick Grip, trim, pearls and netting.

Thank for stopping by~
Connie Mercer/DT Member

Thursday, June 22, 2017

Scrapbooking with Clear Scraps!

Hi, Connie here with a Scrapbook page using an acrylic sheet by Clear Scraps.  I created a background, for the page, using a Geo pattern stencil by Clear Scraps. 

Acrylic_scrapbook page_c.mercer
By sanding the acrylic sheet you get a frosted look and by adding stencils you have created a fun background for your photos. Very cool technique to use when creating with acrylic.  StazOn ink/Black was used to stencil the color on the acrylic sheet.  

Acrylic sheet_sanded_stencil_c.mercer
Love the frosted look of the acrylic by simply running a piece of sand paper over the front of the acrylic.  Remember to remove the plastic film.

Acrylic_chipboard_clear scraps_c.mercer

Layer pattern paper in the center of the page.  Add embellishments, stickers and journal strips. The chipboard word " Friends" is by Clear Scraps.  It was painted with acrylic paint and then adhered with Beacon's Quick Grip the page.

Products used:
Clear Scraps: Deco Shapes
Clear Scraps: chipboard word "Friends"
Clear Scraps: 6" Geo Stencil
Other: S.e.i./paper, Beacon Quick Grip, StazOn ink

Thanks for stopping by~
Connie Mercer/DT Member

Wednesday, May 31, 2017

May tag with Clear Scraps!

Hi, Connie here to share my May tag using the Film Strip Chipboard embellishment along with the 6" Flourish Branch stencil by Clear Scraps.  The ranch is really green and I have been taking lots of photo's so that is the inspiration for the May tag.

Clear scraps_chipboard film strip_c. mercer

I have prepared a collage showing the steps in creating this tag.

Clear scraps_may tag_c. mercer

Cover the chipboard tag with pattern paper. I chose a newspaper print.  Use Black StazOn ink to add color to the Film Strip chipboard piece.  Add pattern paper behind the Film Strip chipboard piece.  Stencil background, using the 6" Flourish Branch, on the tag front and then adhere the Film Strip chipboard piece to tag front.  Finish by adding flowers, a butterfly and rhinestones. Add twine and ribbon to complete the tag.

Products used:
Clear Scraps: Chipboard tag
Clear Scraps: Chipboard Film Strip embellishment
Clear Scraps: 6" Flourish Branch stencil
other:
pattern paper, rhinestones, pins, twine and ribbon
StazOn Black ink and Beacon 3 IN 1
Thanks for stopping by~
Connie Mercer/DT Member

Thursday, April 20, 2017

April Chipboard tag with Clear Scraps!

Hi, Connie here with my April tag, using the chipboard tag, by Clear Scraps.  The tag background is created using pattern paper and stencils from Clear Scraps. 

Clear scraps_april tag_c.mercer

Instructions:
Clear scraps_april tag_chipboard_c.mercer


  • Select one sheet of pattern paper. Trace the tag on the paper and cut it out.

  • Glue to the chipboard tag and sand the edges with a file.

  • Select a couple of stencils and add the patterns to the front of the tag. Place them in random spots using StazOn ink.

  • Layer paper pieces to the front and adhere down.  Add dimensional adhesive for the butterflies.  

  • Add twine to the top of the tag.


  • Clear scraps_april tag_stencil_c.mercer

    Supplies used:
    Clear Scraps: chipboard tag, 6" Chevron stencil, 6" Quaterfoil stencil
    Other:
    StazOn ink, Beacon 3-IN-1, S.e.i., stickers, rhinestones, buttons, flowers.

    Thanks for stopping by~
    Connie Mercer/DT Member

    Friday, April 7, 2017

    Scrapbooking on acrylic ~ Clear Scraps!

    Hi, Connie here with a scrapbook page using a  XL Deco acrylic shape by Clear Scraps.  These shapes are fun to make a scrapbook page from, just treat them like you would paper.

    Clear scraps_acrylic deco_c.mercer
    I have a tutorial on how this scrapbook page was created, using an acrylic shape.

    Clear scraps_acrylic shape_scrapbook_c.mercer
    Instructions:

  • Remove plastic film from the acrylic shape.  With a sanding block rub up and down, on the surface, of the acrylic front.  By doing this you are taking the shine off the acrylic.  You should have a nice mat finish.


  • Wipe the surface with a damp towel and dry.


  • Stencil a pattern on the front of the acrylic shape, using the 6" Brick Wall stencil by Clear Scraps.  For best results use StazOn black ink.


  • Layer pattern paper to create a photo mat for the photograph.  Glue the photo mat to the acrylic front using Beacon 3-IN-1.


  • Clear scraps_beacon_c.mercer
    I really love the frosty look, of the acrylic, by sanding it lightly.   After the layering of paper, to create a photo mat, speckle the front with  irRESISTible Texture Spray.  It works great with acrylic.

    Clear scraps_acrylic deco shape_c.mercer
    Let dry. Add a 5" X 7" photo in the space that was created from layering the papers.

    Clear scraps_deco_c.mercer

    Clear scraps_acylic shape_c.mercer
    Supply list:
    Clear Scraps: XL Deco Shape, 6" Brick Wall stencil.
    Other:
    Beacon 3-IN-1, StazOn ink, irRESISTible Texture Spray, S.e.i.

    Thanks for stopping by~
    Connie Mercer/ DT Member

    Thursday, March 23, 2017

    March is still full of LOVE~ Clear Scraps!

    Hi, Connie here with a layout page using the Expression Large Love Word by Clear Scraps.   You will need to have a pair of scissors and a steady hand to get started.  Creating with acrylic adds great dimension to a layout page.  Get those scissors~

    March1a
    The LOVE word is a vertical piece of acrylic.  To achieve this design the acrylic will need to be cut in half. Using scissors cut the acrylic below the heart.  Remove the plastic from both pieces.  Lay out the letters on the pattern paper and trace the shape.  Cut the letter shapes and adhere to the back of the acrylic pieces.  Ink with StazOn black around the acrylic.

    Clear scraps-acrylic-expressions word-c.mercer
    Attach both pieces of the word to the center of the layout with Beacon 3-IN-1.  Embellish the page and then tell your story.

    Clear scraps_acrylic_c.mercer
    Shading each letter makes the word really pop off the layout page.  Dimensional adhesive is used on the extra embellishments and stickers on the layout page.  The journal strips are created  in Microsoft Word, printed out, trimmed in strips and shaded with black ink.  Every other strip is adhered with dimensional adhesive.

    Supplies used:
    Clear Scraps: Expressions Large Love V 
    other: Beacon 3-IN-1 adhesive, StazOn/black
    pattern paper, stickers, black ink (for splats)  

    Thanks for stopping by~
    Connie Mercer/DT Member

    Friday, March 3, 2017

    Banners Acrylic Layout with Clear Scraps!

    Hi, Connie here with a scrapbook page using the NEW Banners Acrylic Layout by Clear Scraps. This is just one, of many, that Clear Scraps have designed.  So many designs, something for everyone.  They are easy to use and are a great guide for placement of photos and embellishments.  The acrylic adds dimension to the page, plus it looks fantastic!!

    Clear scraps_acrylic layout_c. mercer
    Always remember to take off the plastic film before creating with acrylic.  On this piece the acrylic was inked with StazOn ink, black first and the white over the black, just the outside frame. The banners were covered with pattern paper and adhered to the acrylic, with Beacon adhesive.  Stickers were also used to decorate the banners and adding color to the page. Two of the spaces were used for photos and the other two for die cuts and a journal spot.

    Clear scraps_banners_acrylic layout_c. mercer
    These are really fun to create with.  Looking forward to creating with more Acrylic Layout designs by Clear Scraps.  You can find them all HERE.

    Products used:
    Clear Scraps/Banners Acrylic Layout
    other:Bella Blvd./paper,  stickers, die cuts, StazOn ink, Beacon adhesive

    Thanks for stopping by~
    Connie Mercer/DT Member

    Wednesday, February 8, 2017

    Creating Made Easy February kit by Clear Scraps ~ scrapbook page!

    Hi, Connie here with a scrapbook page showcasing the expressions LOVE acrylic word by Clear Scraps!  I have never used the large words on a scrapbook page and I really love the look.  Take a look~

    I'm using the word "LOVE" in my title along with the stickers from the paper collection in the Creating Made Easy February kit by Clear Scraps ~ Love you & me.


    Designer tip:
    I inked the back of the acrylic expressions word with black StazOn ink.  I removed the plastic from the back of the acrylic word only.  I left the plastic on the front of the word, giving the word a satin look finish.  I liked the look!!!


    If you read what I wrote you will see this photo marks 42 years together and yes, he is still the one!!

    Products used:
    Creating Made Easy February kit
    Expressions Large  "Love" acrylic word

    Thanks for stopping by~
    Connie Mercer/DT Member